
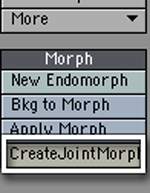
Create Joint Morph (Map > Morph: CreateJointMorph)
This tool moves the mesh as if you were rotating Skelegons,
but without actually moving them at all. This allows you to easily make
an Endomorph
that you can use to smooth mesh deformation as you animate. (Morphing
is another way to move your objects, by forcing them to conform to a different
shape. The point placement for that shape is stored in a Vertex Map,
called an Endomorph.)
This is something you will want to do after you already have your figure's geometry, Skelegons and weight maps in place.
Begin by creating an Endomorph. You can either do this by using the M button in the Vmap Bar and choosing (new), or by clicking on the Map > Endomorph: New Endomorph button. In either case, a dialog will appear that allows you to name the new morph. It's recommended that you give it a name that will allow you to easily identify it in Layout. Something like LeftArm.M_90 is good; that will put the morph into the LeftArm group, and identify it as the morph that makes a bend of 90° look good.
Once you have the morph created, you're ready to move the mesh. (It's a good idea to open the Numeric Panel for the next steps.)
Click the CreateJointMorph command. If you have a Skelegon selected, you'll see an active panel. If you don't, then simply select a Skelegon.
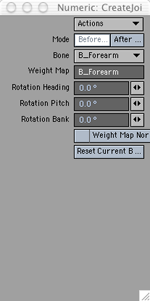
You need to start in Before... mode, so make sure that button is the one that's highlighted.
Select the bone you want to work with from the Bone drop down menu, if it's not already selected. The Weight map that is used by the bone will automatically show in the Weight Map field. (The field is for informational purposes only; you cannot change it.)
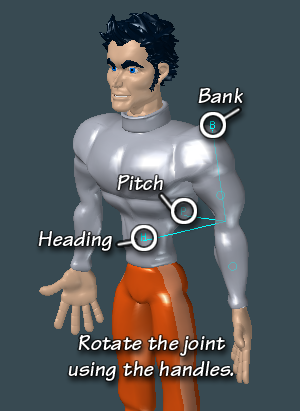
When you do this, you will notice that cyan rotation handles have appeared at the joint. They are labeled H, P and B, for Heading, Pitch and Bank. (Heading is rotation around the Y axis, Pitch is rotation around the X axis, and Bank is rotation around the Z axis. These terms should be familiar to you from Layout.)
You can move the arm by dragging these handles, or you can enter the values you want directly into the Rotation Heading, Rotation Pitch, and Rotation Bank fields in the Numeric Panel.
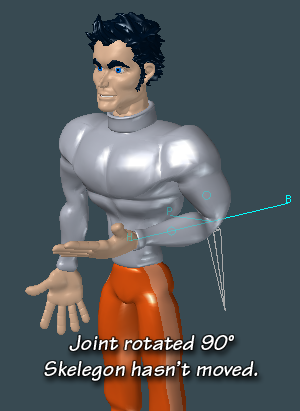
Adjust the joint the desired amount and direction. For instance, in our example, bend the arm so the pitch is 90°. As you do you will notice two things. First, there is the normal weirdness at the elbow. Secondly, although the mesh has moved, the skelegon has not!
Drop the CreateJointMorph tool, either by tapping the spacebar, or simply getting the first of the Modify tools you plan to use for the endomorph.

Go ahead and manipulate the mesh, reworking the area until the elbow looks more like a bent elbow, and less like a piece of folded foam rubber. (You can even make the bicep bulge, if you are so inclined.)
Hints: It's often easier to select the points in the crease if you flip back and forth between the Base and the endomorph. Any points you select in the base will remain selected in the endomorph. (But move at least one point before you switch, or LightWave will think you didn't want the morph, and it will vanish.) It's probably a good idea to hide the skelegons, so you don't accidently move one of the points on them. (Select them in the Polygon Statistics and tap the minus key to hide them.) You might want to hide everything else, too, except the arm you're working on. When you are finished, show everything that's been hidden by tapping the \ (backslash) key.
When you are pleased with the results, click on CreateJointMorph again. Select the same bone, but this time, bend it the same amount in the opposite direction. In our example, that would be a pitch of -90°. The arm will now be in the same orientation that it was when you started.

Click the After button; you will probably see a bulge where you worked on the joint; but that's alright. The Joint Morph is finished, and ready to take into Layout. Drop the tool, and save the object.
