
Distributed Rendering: Introduction
Introduction
If you are a computer geek – and many of you are – you probably have more
than one computer in your studio. Even if they are last year's models,
if you network them together, they still can be useful for rendering LightWave
scenes. This technique of employing the processing power of other computers
on a network to render scenes is called distributed rendering. And when
all those CPUs are rendering the archetypal LightWave cow, you have created
a render farm.
The distributed rendering program that is packaged with LightWave is called ScreamerNet. It uses Layout’s Network Rendering panel (Render > Network Render) to control submitting scenes to networked computers running the ScreamerNet process. ScreamerNet can control up to 1,000 CPUs. Each CPU takes a frame, renders it, and then grabs the next available frame in the animation until the scene is complete.
If you're familiar with NewTek lore, you'll remember the speedy (for its day) computer prototype called Screamer. This is back in the Seaquest and Babylon 5 years when LightWave studios were cranking out TV visual effects on render farms of Amiga 4000's. It was from these days that ScreamerNet was born. Though many who have toiled to set up ScreamerNet would swear (as in curse) that the title has more to do with the resulting mental state.
Honestly, the set up of ScreamerNet can be tedious and the command lines sound a bit like a cat coughing up a hairball; but when you have ScreamerNet running and you're churning through frames in record time, you'll be screaming for joy.
Note: ScreamerNet is limited in its features. If you are a serious studio or just need more features and flexibility when rendering scenes, you should check out third party rendering programs that are more powerful and feature laden.
Are
You Talking to Me?
Before ScreamerNet is discussed, your computers must be talking to each
other, which means they need to be networked together. Setting up a network
is beyond the scope of these instructions, though the experience can be
quite rewarding. If you don’t have your computers networked, go on, we’ll
wait.
Hint: Since ScreamerNet communicates by writing files. NetBEUI and TCP/IP are not required. As long as each machine can see each other and write files across the network, ScreamerNet should function properly.
Note: If you are network deprived, you still can use ScreamerNet to batch-render multiple scenes on a single computer. See the Batch Rendering on One Computer section near the end of this chapter.
Share
and Share Alike
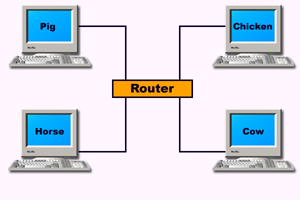
Once you have created your network and the computers are talking to each
other, you’re ready for the next step. On our render farm, let’s say that
we have four computers (Pig, Horse, Cow, and Chicken) networked together.
(For now, imagine that they are all single CPU machines.)
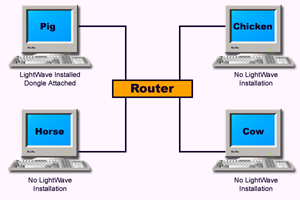
In a ScreamerNet
setup, you designate one of the computers as the control or host machine.
It hands out the rendering assignments, (called jobs), to the nodes (the
CPUs on the network used for rendering). The host must have LightWave
installed on it. In this scenario, Pig will be the control machine. Node
machines do not need any NewTek software or hardware on them.
For ScreamerNet to work, all the nodes need to access specific files. Of course, all the nodes need to share the scene file and all its accompanying data including object and image files. If you’re organized, all these will be tucked away in your LightWave Content directory. Also, the nodes need to save the rendered frames to a shared directory. Each node must be able to load a plug-in configuration file (LWEXT8.CFG) that has the plug-in files mapped with a path that the node can access. Finally, the ScreamerNet command program, (LWSN.EXE), needs to be visible to all the nodes.
Perhaps some of the confusion about setting up a ScreamerNet system arises because there is more than one way to organize a sharing scheme and you may have read tutorials that herald one method over another. If set up properly, all the schemes will work. So depending on your situation and disposition, you should choose the most suitable one for you.
Note: The following instructions refer specifically to setting up ScreamerNet on a Windows based system. You also can use ScreamerNet on Mac and Linux computers. You can find helpful tutorials for those systems on Scott Cameron’s LightWave tutorial website, http://members.shaw.ca/lightwavetutorials/.
Drive
Mapping
To share, data must be at a unique address that all the nodes on
the network can access. Normally, your scene file is sitting in your LightWave
Content directory, which is typically on your C drive. In our case, the
scene, oldmacdonald.lws, would be in Pig, the host computer. Now in our
animal farm network, Pig, as the host, would distribute out a rendering
job that said, “Render oldmacdonald.lws that is on the C drive.” The problem
is that when Horse gets that instruction, it looks on its C drive and
can’t find the scene. So Horse says, “neigh.” It cannot render a scene
that it can’t find.
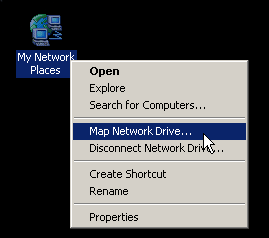
The solution
is to map a unique network drive (or drives) that contains all the necessary
LightWave files. Normally, these files will be on the host computer. If
that is your case, go to your host computer and on your Windows screen,
right click on the Network Places
icon and choose Map Network Drive…
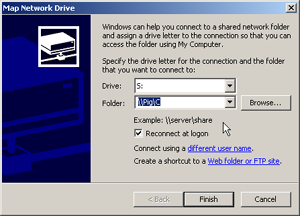
In the panel,
when you specify a drive letter, make sure that it is unused by any of
the computers on your network. For example, Pig might only use five drive
letters, A to E, so letters F to Z are available. But Chicken may have
a dozen hard drives on its computer, which means it is using drive letters
A to L. If you mapped a drive on Pig with the letter G, Chicken could
still be confused. In our situation, we’ll pick S for the drive letter.

Next, you
specify the folder that you want to connect to this drive letter. There
are two schools of thought about the folder. The orderly and efficient
approach makes a folder with only the necessary files in it and attaches
it to the mapped drive letter. The “kitchen sink” method simply picks
the hard drive LightWave is in and selects that as the folder. For example,
on Pig, LightWave is in the C drive. In the Map Network Drive panel,
you would click Browse… next to the
Folder
entry box. Under Microsoft Windows Network, go to Pig and highlight the
C drive. Click OK. The Folder
box would read \\Pig\C.
Now if you
want to be more elegant about your mapped drive, you can just map your
LightWave folder. The process is the same, right click on the Network Places
icon, choose Map Network Drive… and specify
a unique drive letter. This time when you browse for a folder to attach,
select your LightWave folder.
Both of the above methods assume that all the necessary files are in your mapped drive. If you’re organized, then all of your objects and images will be in your Content folder. Back in the old days of the 20th Century when humongous hard drives were nine gigabytes and drive space was scarce, often you would store your rendered frames on another drive. If your scene accesses any data from other drives or stores frames elsewhere, then those folders must be accessible to the network nodes. That means that you will need to map more drives.
For another way of sharing folders, Matt Gorner, (in an exhaustive, informative ScreamerNet tutorial), shuns the drive mapping technique. In his method, (which you should read about directly), he simply sets up network sharing access of his LightWave folder. Matt goes into great detail about the whole process.
Since all the computers on your network need to share files with this mapped drive, you will need to map that drive on all your computers. After you have, you can test the connection by copying files into that drive from the node computers.
Organizing
Configuration Files
Unfortunately, we are not finished with this job. But guys, before we move
on, let’s discuss the “c” word – commitment. Often you will read about
ScreamerNet setups that construct two file directories, one specifically
for ScreamerNet and another for when you don’t use ScreamerNet. Listen,
if you have gone to all this trouble to woo the girl, commit. You’ll see
no difference in running LightWave under a ScreamerNet setup; and if you
decide to render across your network, you’ll be ready to go. Of course,
if you’re commitment phobic, then Matt Gorner explains a nifty way of
organizing a dual setup.
The next steps
involve changing certain LightWave configuration files so that they are
ScreamerNet friendly. Before you do, you should get those files where
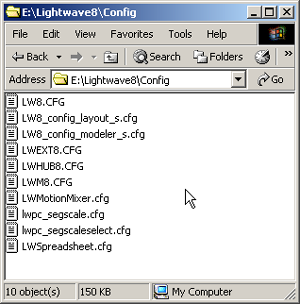
you can see them. Start by creating a new folder in your LightWave directory
called Config. Now, click on the My Computer
icon and do a search for LWEXT8.cfg,
(the plug-in configuration file), and move it to the Config folder. (Often
it is buried in the Documents and Settings directory.) Do the same for
the LW8.cfg file.
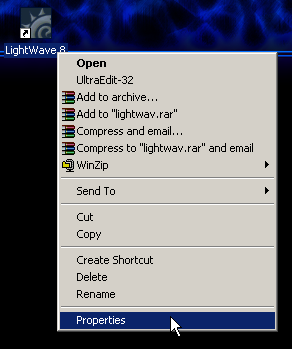
Next, you need to point LightWave to that Config folder when you start
the program. On your Windows desktop, right-click on the LightWave icon
and select Properties.
Depending
on your setup, in the Target box, it will
say something like:
C:\Lightwave8\Programs\lightwav.exe
This points to Layout’s program file.
If you have set up the Config folder, change this line to read:
C:\LightWave\Programs\lightwav.exe -cc:\LightWave\config
The first part
is unchanged. The second part, ( -cc:\LightWave\config), tells LightWave
where to look for the configuration files. The -c is the config cue. The
rest (c:\LightWave\config) is simply the path.
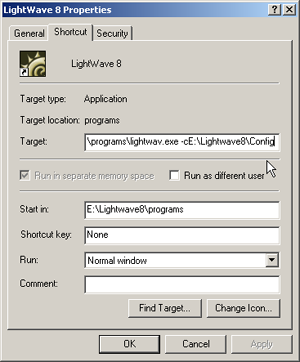
Note: This is a command between you and
your host computer so the path does not need to reflect the network mapped
drive letters. Though if you want to remain consistent, than you would
write this Target command in ScreamerNet terms. In our case, it would
then read:
S:\LightWave\Programs\lightwav.exe -cS:\LightWave\config
Please notice that there is no space between the -c and path name.
Command
Directory
When you run ScreamerNet, the host sends out Job files to the nodes and
receives Ack (Acknowledgement) files back. You need to set up a Command
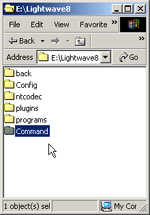
directory to store these files. So, in your LightWave directory, create
a new folder titled Command.
Now open
up Layout on your host computer. Click the Render
tab and under Utilities, click on Network Render.
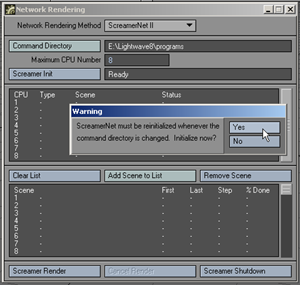
In the Network Rendering panel, click
on Command Directory and locate the
newly created Command folder on your mapped drive. In our case, S:\LightWave\Command.
A message pops
up that says, “ScreamerNet must be reinitialized whenever the command
directory is changed. Initialize now?” Click, Yes.
You can close the Network Render panel.
Next, click
Edit > Set
Content Directory.
Choose the Programs directory on your mapped drive, in our case, S:\LightWave\programs.
Finally, you need to remap your plug-ins. And again, there are two methods. The search and replace technique involves opening the LWEXT8.cfg file in a text editor. The lines would originally look like this:
{ Entry
Class
"AnimLoaderHandler"
Name "AVI(.avi)"
Module
"C:\\LW8Beta\\lightwave_8\\plug-ins\\input-output\\avi.p"
}
{ Entry
Class "AnimLoaderHandler"
Name "DirectShow(.avi)"
Module
"C:\\LW8Beta\\lightwave_8\\plug-ins\\utility\\dvview.p"
You would search for C: and replace it with your mapped drive letter. In our case, it would be S:. Save your changes and you’re done. This method is great if you like to dig in there, get your hands dirty and see exactly what you are doing.
In Matt Gorner’s solution, you click on the Utilities tab in Layout and select Edit Plug-ins. In the panel, choose Scan Directory. Browse to your mapped drive and highlight the Plug-ins folder. Hit OK and an Add Plug-ins window will pop up. Next, if the lscripts folder is not in the plug-ins folder, then choose Scan Directory again, highlight the lscripts folder and click OK. Now, if you open the LWEXT8.cfg file in a text editor, you should see that all of the plug-ins have been remapped to the network drive.
To save the changes to the configuration files, you need to Quit LightWave. When you start it up again, the new configurations will be loaded.
Yackety,
yak
All right, now that you have all the necessary files configured and in
folders that can be accessed by all the nodes, it is time to set up ScreamerNet
itself. In our example, we have four computers in our ScreamerNet render
farm. Pig is the host and will be handing out directions to the other
three rendering nodes. To keep organized, you will assign a unique number
to each node.
Note: Since being the Host computer is not too taxing, you probably also will want to use it as a rendering node.
To initialize a node for ScreamerNet, you need to create a separate file that you will store and run on each node. To assist you, in the LightWave\Programs directory, you can find a file called startlwsn_node.bat. Open it up in a text editor. It should read:
cd S:\Lightwave\Programs
LWSN.exe -2 -cS:\Lightwave\Config S:\Lightwave\Command\job1 S:\Lightwave\Command\ack1
You can use this file as a guide. It consists of two lines. (Everything from LWSN.exe to ack1 is the second line.) Edit it to fit your specific setup and save it with a new name. Each computer that is a rendering node needs this file on it. You can call it whatever you want, just remember to keep the .bat extension. Be creative – YouScreamIScream.bat or SpeedKills.bat.
The first line indicates where to find the lwsn.exe program. The second line begins by running the ScreamerNet program in –2 mode. (There is a –3 mode that is explained later.) Simply, leave this part of the line as it is.
Next is a –c command, which indicates where to find the configuration program. If you have been following along, you will have set up a Config folder and moved your LW8.cfg and LWEXT8.cfg files there. If it is located elsewhere, change this path.
The next path tells ScreamerNet where to find the job commands. Again, if you have been following along, you have created a Command folder and changed the Command Directory path in Layout. The last path simply indicates where the acknowledgement (ack) files are located.
The numbers after job and ack indicate the node that is running this batch file. Each node has a unique number. Usually, if you are using the host computer as a rendering node, you assign it number 1. So, its batch file would read job1 and ack1. In our case, Pig would be node 1. You then number the other nodes. For example, Horse would be 2, Cow would be 3, and Chicken would be 4.
Each of the computers on your network needs a copy of this node initialization batch file customized to it. For example Horse’s file would read:
cd S:\Lightwave\Programs
LWSN.exe
-2 -cS:\Lightwave\Config S:\Lightwave\Command\job2 S:\Lightwave\Command\ack2
Cow’s would say:
cd S:\Lightwave\Programs
LWSN.exe
-2 -cS:\Lightwave\Config S:\Lightwave\Command\job3 S:\Lightwave\Command\ack3
If any of the computers have multiprocessors, then it would need two batch files. Let’s say Chicken is a dual processor machine. You would create one file for each processor. The first might read:
cd S:\Lightwave\Programs
LWSN.exe
-2 -cS:\Lightwave\Config S:\Lightwave\Command\job4 S:\Lightwave\Command\ack4
The other would say:
cd S:\Lightwave\Programs
LWSN.exe
-2 -cS:\Lightwave\Config S:\Lightwave\Command\job5 S:\Lightwave\Command\ack5
Obviously, you would have to name the batch files differently, such as StartNode4.bat and StartNode5.bat.
When you have all the batch files placed on the node computers, create a shortcut for them on your desktop.
ShowTime
You are about ready to make the magic happen. Go back to your host computer,
open Layout and load the scene that you want to render over the network.
Make sure that the Content directory is set to the mapped drive.
Under the Render tab, open up the Render Options panel. Sometimes, you may not want to render all the frames in the scene. What you can do is set the Render First Frame and Render Last Frame fields to the desired range of frames. Make sure that you have Auto Frame Advance checked.
Also, check Save RGB. Remember, ScreamerNet only renders individual frames. It will not render animation files. In the RGB Files field, indicate the network-mapped path of where you are saving files. For example, S:\LightWave\Frames.
Save the scene.
Hint: You can batch render scenes in ScreamerNet. So you could save a scene and then go back and change it (for example, to render a different range of frames) and then save the scene with another name.
Once the scene(s) are saved, click on the Render tab and Network Render. In the Network Rendering Method, choose ScreamerNet II, (which is probably the only choice you have).
The number that you enter in the Maximum Number CPU field should be the highest number node that you will be using. For example, if we would be using just node 1 (Pig) and node 2 (Horse), you would enter 2. But let’s say that Horse wasn’t available but Cow was. Even though, you are still using only two nodes, you would enter 3 so that ScreamerNet would look for node number 3, which is Cow.
Now go to the
node computers and click on the batch file icons that you created. A black
MS-DOS window will open up and before you can start reading what it says,
a continuous flow of repeating messages will probably begin. Depending
on your exact setup, the message will read like:
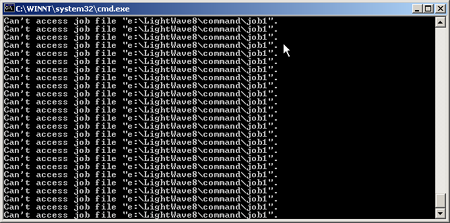
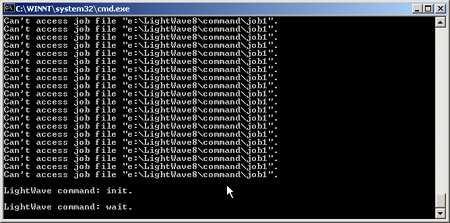
Can’t open
S:\Lightwave\Command\job1
This will be
normal until LightWave initializes ScreamerNet. Once you have started
all your nodes, return to Layout and click on the Screamer Init button.
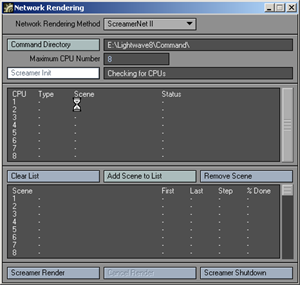
After a
brief pause, you will receive a confirmation of the number of CPUs detected
and the Screamer Init field will say Ready.
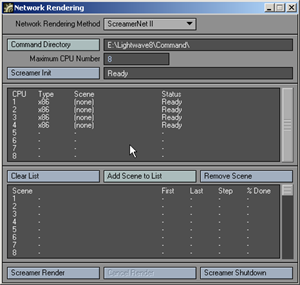
Now, if
you look back at the node’s MS-DOS window, the message will say Init and
then Wait. The nodes are waiting for their job commands.
In the Network Rendering
panel, click on Add Scene to
List
and find the scene or scenes. They will be displayed in the Scene List
in the order they were selected. Notice that the List indicates the First
and Last Frame to render, the frame advance Step, and the % of those frames
that have been rendered.
If you added a scene by mistake, highlight it and click Remove Scene. If you want to remove all the scenes, click Clear List.
When the list is complete, click on Screamer Render. The job commands will be sent to the nodes, which are waiting in line. Node 1 receives the first frame, node 2 will take the second, and so on down the queue. If you look back at the node’s window, you will see it document its progress in the render.
As soon as a node finishes a frame, it receives the job to render the next available frame in the scene. When the scene is completed, ScreamerNet jumps to the next scene in the list.
Note: You may wish to check some of the first frames in a photo editing program to see if they are what you expect. If you are having problems, please read the Troubleshooting section below.
When you are finished rendering all the scenes and are ready to close ScreamerNet, click the Screamer Shutdown button. A panel will pop up that says, “Are you sure you want to shut down the ScreamerNet CPUs?” If you choose Yes, the nodes are closed and their MS-DOS windows disappear. Now, if you wish to start a new session, you must restart ScreamerNet on each CPU and re-initialize the CPUs from the host machine.
If you want to stop rendering before ScreamerNet is finished, press the Esc key to abort the session. A message will appear in the Screamer Init window saying, “Waiting for CPUs to finish rendering.” If the scene is complex or one of your nodes is slow, waiting could take a quite a while.
Hint: If you are impatient, there is no elegant way to force the nodes to quit in mid render. If you can’t wait, you can close LightWave by hitting Ctrl + Alt + Del, clicking the Task Manager button, highlighting LightWave and selecting End Task. Then, you can stop each node by closing its MS-DOS window. It’s brutal, but it works.
WARNING: If you close the MS-DOS window on any of the render nodes, you may have to restart all nodes and re-initialize them.
Batch
Rendering on One Computer
Even if you only have one computer, ScreamerNet can be useful for rendering
a series of scene files unattended. You simply set your computer as both
the host and a node. You don’t need to network map your drive, but you
will need to create a batch file to start the node. The rest of the procedure
is the same. Of course, if you are using a dual-processor machine, each
processor should be treated as a separate CPU for rendering.
Rendering
Without LightWave
The LWSN program has a third option that lets you render a scene without
running LightWave. There is no control machine and thus it is not a distributed
rendering situation. You must tell the program specifically what to render.
The method is run from a DOS prompt using the following syntax (one line):
LWSN -3 [-c<config dir>] [-d<content dir>] <scene file> <first frame> <last frame> [<frame step>]
As you can see, you supply the program with the basic information needed to render a scene. An example would be:
LWSN -3 -cS:\Lightwave\Config -dS:\Lightwave\Content oldmacdonald.lws 1 900 1
In the example, the program would render frames 1 through 900 of the oldmacdonald.lws scene using the config files stored in the S:\Lightwave\Config and using S:\Lightwave\Content as the Content Directory.
HINT: You can get the syntax for ScreamerNet by simply typing LWSN with no arguments.
Troubleshooting and limitations:
The most common cause of ScreamerNet crashing is when too many nodes try to write or read their information to or from the Host computer while the host renders. If that seems to be the case, try saving the frames to a mapped network drive on another computer. You will have to go back to your scene and redirect the path for saving frames. Of course, make sure that the new drive has enough space to store the frames.
If that doesn’t solve your crashing problems, do not use the host machine as a render node. Use it only as a server where the hard drives are found.
ScreamerNet can be finicky about how filenames and directories are composed. Putting spaces in a name, for example, old macdonald.lws, might cause a problem. Try using a dash, -, or an underscore, _, instead of spaces, old_macdonald.lws.
Some plug-ins don’t like running with more than one thread. For ScreamerNet scenes, go to the Render Options panel, (Render > Options > Render Options). In the Multithreading drop-down menu, change to 1Thread, and save the scene. Quit LightWave and start it again. This will update the configuration files. You then will need to restart all the nodes so they will read the updated configuration files.
Matt Gormer also lists other possible problems and solutions in his tutorial. With his permission, they are excerpted below.
Hopefully everything is running smoothly, but problems can occur, usually because something is setup wrong. Some of the main problems that arise are listed here along with possible remedies.
The biggest limitation to ScreamerNet are plug-ins that are not written to take advantage of it. I’m not aware of a definitive list of all the ones which do and don’t work. If in doubt read the documentation that came with the plug-in, it should say whether it has problems or not. If it doesn’t say but the plug-in still doesn’t seem to be work, re-scan your plug-ins to update the LWEXT8.cfg file. If it still doesn’t work then chances are it’s not compatible with ScreamerNet.
If your scene uses procedural textures (fractal noise etc.) you may experience differences in the pattern if you render on machines with different processors. Mixing old and new processors, AMD and Intel, could lead to problems. This is really only a problem with animations as textures could suddenly change from frame to frame, if in doubt run a test or use all computers with the same processor type.
Another known problem with ScreamerNet (correct as of v7.5c of LightWave) is its dislike for scenes that have had a Spreadsheet used on them. Plug-ins like Spreadsheet save data to the scene file, which causes ScreamerNet to hang. The only way around this is to remove the entry in the scene file made by Spreadsheet.
Open your scene files in a text editor. Near the top you will find an entry that says:
Plug-in MasterHandler 1 .SpreadsheetStandardBanks
followed by:
EndPlug-in
There will be another right after that entry that starts with:
Plug-in MasterHandler 2 SpreadsheetSceneManager
and if you scroll down there will be another:
EndPlug-in
Highlight all the text between the first Plug-in MasterHandler and the last EndPlug-in, delete it, then save the file, it should now render okay.
Problem:
“My nodes can’t find the job files.”
Possible
solution:
They can’t find the job files because they can’t see the Command folder,
which holds them. So open up the node batch file and check the script
lines that end in job and ack. Make sure that pathname before these words
point to your Command folder.
Also check that all the render node computers have access to read and write to the folder.
Problem:
“My nodes seem fine but when I press Screamer Init it can’t find any CPUs.”
Possible
solution:
Again this is a command folder problem, check that the Network Render panel
has the same Command Directory path as the nodes batch file. Also check
that the host computer has access to read and write to the folder.
Problem:
“Rendering seems to be working but no files are saved.”
Possible
solution:
The messages output in the node’s MS-DOS window will often give you a clue
to the problem. For example, it might say that it could not find an object
or image that was in the scene. This can be caused when the Content directory
that the rendering node is accessing does not contain all the scene’s
data. Check that the render batch files are looking in the correct place
for the config files, and that they can access the folder on the network.
Next, make sure your scene file is saving RGB FILES and not an animation (.MOV / .AVI etc.) in the Output tab of the Render Options panel. ScreamerNet can ONLY save individual frames.
Finally, check that your plug-ins (LWEXT8.cfg) file is up to date by re-scanning them using the pathname all the nodes will be using to find them on the network.
Problem:
“Rendering seems to work okay but all my saved files are in .FLX format.”
Possible
solution:
There are two possible reasons. The first is that ScreamerNet can’t find
the plug-in to save in the format you’ve specified, so check that your
plug-ins (LWEXT8.cfg) file is up to date by re-scanning them using the
pathname all the nodes will be using to find them on the network. Also
check that the render batch files are looking in the correct place for
the config files, and that they can access the folder on the network.
The second reason is that that the render node that saved the file ran out of memory to load the saver plug-in so, as a last-resort, it used the built in FLX saver.
If you have a whole scene’s worth of FLX images, you can use LightWave to convert them into your desired format. Simply load the series as a sequence of images for the Backdrop in a blank scene and render in the proper format. If you only need to convert a few FLX images, load them into the Image Editor panel. Highlight the name of an image and double-click on the preview, (or just double-click on the name), to open it up in the Image Viewer. Now, click on File > Save RGBA, and pick your format.
Problem:
“My particles aren’t working.”
Possible
solution:
Particles are a mathematic simulation. Therefore,
each computer would start calculating the particles at the start of each
frame rendered. The
way to fix this is to “bake” the motion of the particles. What you do,
is to save the particle FX calculation to disk (as a .PFX file) in the
folder with the scene file, or to a mapped drive that can be seen by all
the networked computers.
Problem:
“Motion designer isn’t working.”
Possible
solution:
Same as particles, this is a mathematic issue. The way to handle this is
to bake the motion, and save the motion designer calculation to disk (as
a .MDD file) in the folder with the scene file.
