
Expressions
Expressions are an advanced LightWave 3D feature that uses mathematical formulas to modify the value of any animation channel. Expressions let you make the motion of scene items dependent on other item motions or factors in a scene. You could, for example, force an object to stay between two other objects, keep feet from going through the floor, or even control the entire posture of a character based on its feet! The possibilities are endless.
There are two types of expression, "Bracket" expressions and “LScript” expressions. Each has their advantages and disadvantages. Bracket expressions take their name from the fact that the channel they are reading is always enclosed in square brackets, “[“ and “]”. The LScript expressions have a syntax similar to that of LScript. You can use much of the LScript documentation to help with the use of the functions available for using in LScript expressions.
Note: If you would a reference of available functions - you can get them from the LScript documentation or from Expression Builder.
Bracket Expressions – syntax
Bracket expressions
always have the channel reference enclosed in square brackets and have
the general syntax as shown in the figure.
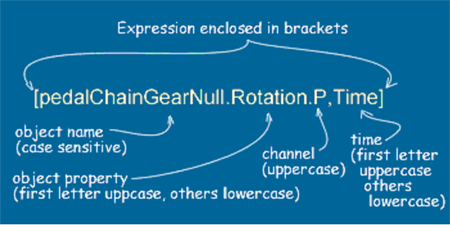
You can also use “Frame” in place of the “Time and you can also do things
like refer to earlier times e.g. [objectName.Position.X, Time – 0.1]
The primary
disadvantage of Bracket expressions is that they may only be used via
the “Expressions'' tab in the graph editor.
They also cannot be used as part any motion that uses an IK calculation.
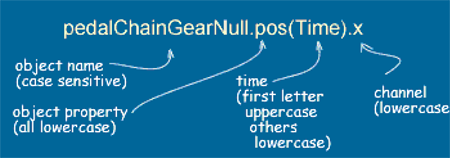
LScript Expressions - syntax
LScript expression are not enclosed by square brackets. The object property is all lowercase, as is the channel – see the figure below.
LScript Expressions are generally used via the ``Modifiers'' tab in the
graph editor,

or, more typically, via the Motions
Options
panel
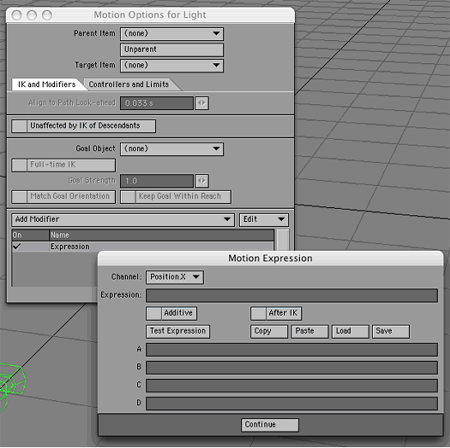
One advantage of LScript expressions applied in the Motion Expressions
panel is that they can act After an IK example.
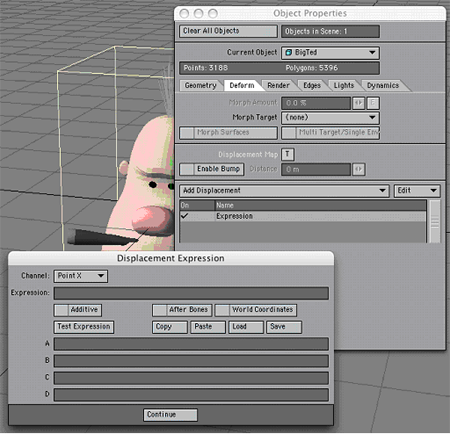
LScript expressions can also be used to create expression-controlled displacements via the Displacements panel where the expression can act before or after a bone deformation.
Using Expressions – Examples
Expression Basics: Rotating a Gear
I've been using
LightWave 3D® for many years now and Expressions have always been something
that I considered too technical, something that I'd give my math friends
to work on. It wasn't until recently that I found out that it's quite
simple to use expressions for
many things. This tutorial will walk you thru setting up a basic expression
that will help speed up animating gears on a Mech. I promise this wont
hurt. :)
Creating an Expression:
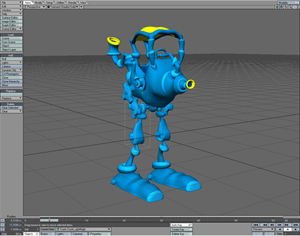
Step 1: Load the Crunk Car from the Content CD.
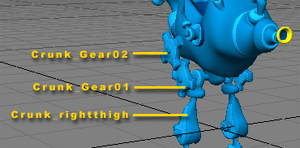
Our goal in this setup is to have the gears automatically rotate when the Thigh "Crunk_rightthigh" is rotated. The lower gear "Crunk_Gear01" is already setup to rotate by being parented to the thigh. We can do this because the lower gears pivot point is in the same place as the Thigh. The upper gear "Crunk_Gear02" doesn't share the same pivot point and needs to rotate in the opposite direction. You could manually animate the upper gear but using an expression will save you the hassle.
Step
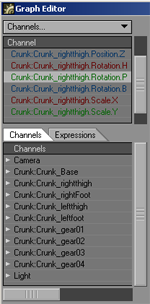
2: Select "Crunk_rightthigh"
as the Current Object.

Step 3:
Open the Graph Editor by clicking on the Graph Editor button. (CTRL +F2)
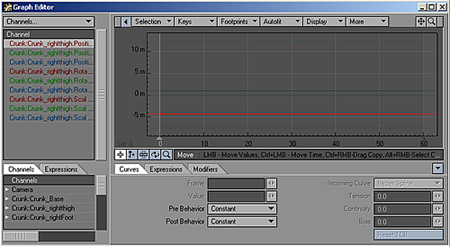
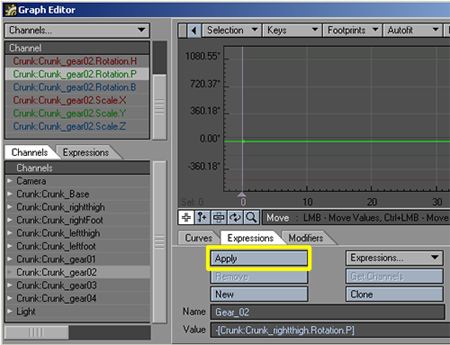
Step 4:
Click on the Expressions menu tab located
under the graph display.
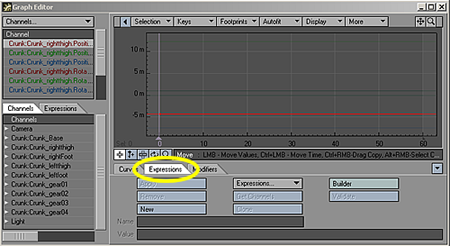
Step 5:
Click the button labeled "New" and give
it a name. I chose to name mine "Gear_02".
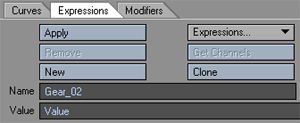
Step 6:
In the Value field, select "Value" and replace it with "-".
The "-" will make the gear spin the opposite way of the thigh
by giving it a negative value.
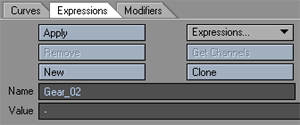
Step 7:
We want the Gear to spin the opposite way of the Thigh by giving it a
negative value of the Thigh's Pitch. The "-" makes it negative,
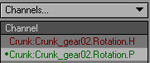
now all we need is the Pitch value of the Thigh. From the Channel List
Choose "Crunk:Crunk_rightthigh.Rotation.P".
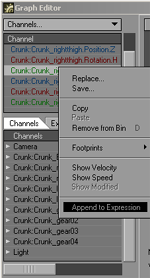 Step 8: Right-Click
and Choose Append to Expression.
Step 8: Right-Click
and Choose Append to Expression.
The Value Field should look like this:

Congratulations! You have just written your first expression. Now that
wasn't so hard was it? All we need to do now is apply this expression
to "Crunk_Gear02" and we'll be finished with the setup. Let's
continue.
Applying an Expression:
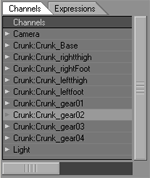
Step 9: Now that we have our Expression let's apply it to the Gear. From the Channels list select "Crunk_Gear02".
Step 10:
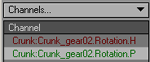
From the Channel List Choose "Crunk_gear02.Rotation.P".
Step 11: Click
Apply.
Note: A small dot is placed next to the channel to let you know that it
has an expression attached to it.
Let's take a look at what happens when we rotate the Thigh.
Step
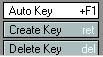
12: Close the Graph Editor window and make sure that Auto
Key Create is selected.
Step 13:
Select "Crunk_rightthigh" as the
Current Object, and rotate it's Pitch.
Crunk_Gear02
should rotate on it's Pitch in the Opposite direction of Crunk_Gear01 and Crunk_rightthigh.
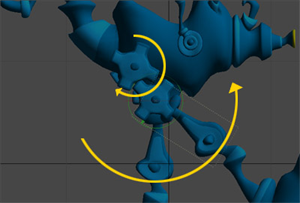
Well, there you have it. Your first expression applied and in action. I
told you this was going to be easy. We've only scratched the surface on
the power of Expressions in LightWave.
Expression Builder
In this example we will use the Expression builder to center the hips of a character between its two feet. This example assumes the characters hips are not determined by any form of IK calculation. If that is the case you will need to use LScript expressions (applied via the Motion Options panel) as only Lscript expressions can after after IK.
Right – lets get to it! Assume the name of the characters two feet are “footLeft” and “footRight” and that the position of the hips are controlled by a single null called “hip”. To center the hip null we will fix its X and Z coordinates (and leave the height, Y, to the animator).
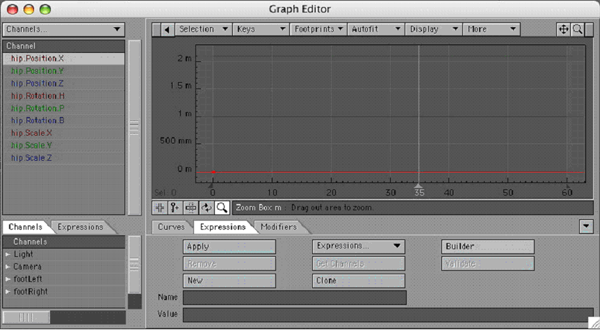
Open the Graph Editor and load the hip channels. Click on the Expressions tab – you panel should look like the figure
If you select your hip null before opening the Graph Editor then the hip
channels will automatically be added to the channel bin.
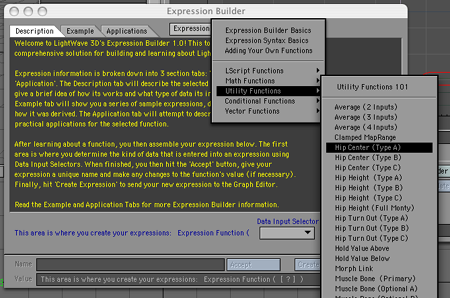
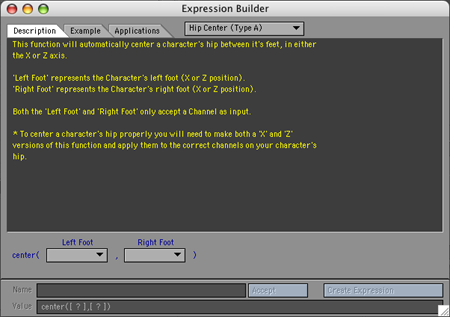
First we will create the bracket expression to center the X coordinate of the hip null. Click on the “Builder” button to open the Expression Builder panel, click on the expression template button at the top of the panel and select the "Hip Center (Type A)" menu option as shown below
This brings up the expression template – all you have to do is say which
channels you want to slot in to the template. Expression builder will then create the full expression for
you and add it to the Graph Editor. The template for hip centering looks
like can be seen below.
The good thing about the Expression Builder
(apart from creating a template for you) is that it also gives an explanation
for how to use the expression template. To
center the hips we will use the “center” function. This function takes
two arguments, the two coordinates between which you want to center the
object. The important thing to understand is that the expression can only
center in one dimension. To center in two dimensions (ie.
the X and Z coordinates) we use the expression twice. Once to center the
X coordinate and a second time, using the Z coordinates, to center in
the Z direction. Centering in both the Z and X directions at the same
time gives you centering in two dimensions, in this case in the XZ plane.
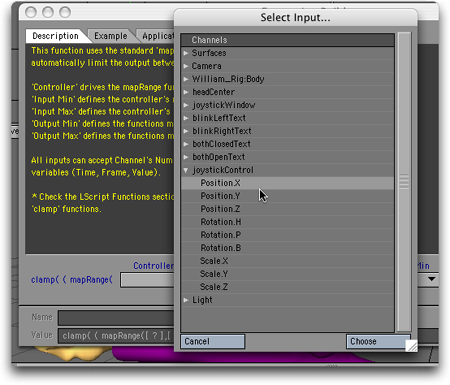
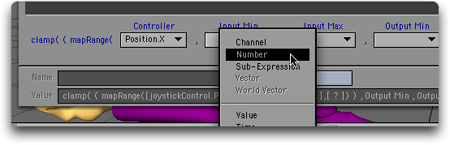
Back to the EB template First for the X direction. We need to enter the X position of the left foot and the right foot. To do this for the left foot click the “Left Foot” pop up menu button and select the “channel” option to bring up the channel selection panel as shown
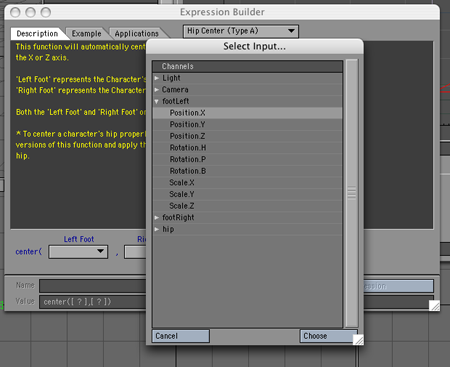
and then select the “Position.X” of the footLeft object. Click
“Choose” and you should notice the X position channel of the footLeft
object has been entered in to the expression (which is written in the
“Value” field on the panel) as shown
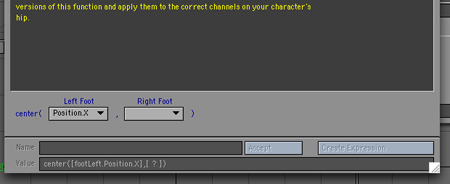
Do the same for the “Right Foot” pop up menu, but now select the Position.X
channel for the rightFoot object. The EB panel should now look like this:
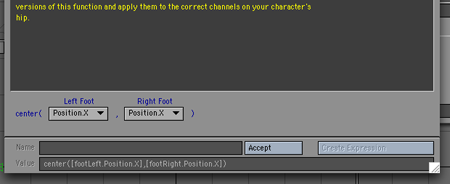
Now, click the “Accept” button to accept the expression. EB gives the expression
a name in the “Name” field – usually something like “newExp_2” – delete
this and replace it with something meaningful like “centerHips_X”. Finally,
click “Create Expression” – this tells EB to enter the expression in the
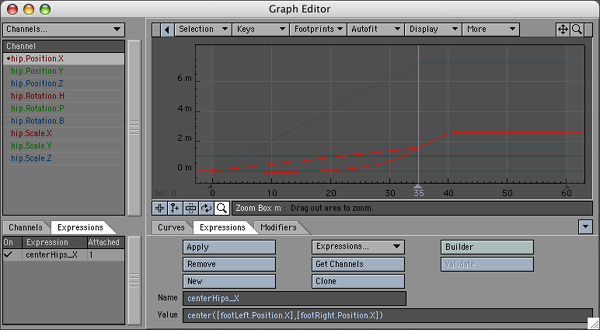
expression fields in the Graph Editor. Close EB and the Graph Editor should
now contain your expression as shown below.

In order for the expression to actually affect the X coordinate of the
hip object we need to “Apply” the expression the X
channel of the hip object. To do this select the “hip.Position.X” channel
in the channel bin and then click the “Apply” button. The hip.Position.X
channel should then have a dot to the left of the name to show that that
channel has an expression applied to it. If you have the “Always Show
Modified” switched on in the Graph Editor options then as soon as you
apply the channel the modified curve will appear in the curve window as
shown
We still have to center the Z coordinate of the hip object. To do this
you could use the Expression builder again (choosing the Positon.Z channels
for the foorLeft and footRight template slots), however, there is a quicker
method. Since the expression for the Z coordinate is similar to the X
coordinate we can create it by “Cloning” the centerHip_X expression. You
do this by clicking the “Clone” button (on the Expression Tab of the Graph
Editor). This will create the same expression, but with the new name “centerHip_X
(Clone)”. All you need do it edit the expression name – change it to something
like “centerHip_Z” and then change the X’s in the actual expression to
Z’s. Then select the hip.Position.Z channel in the channel bin and click
“Apply” to get
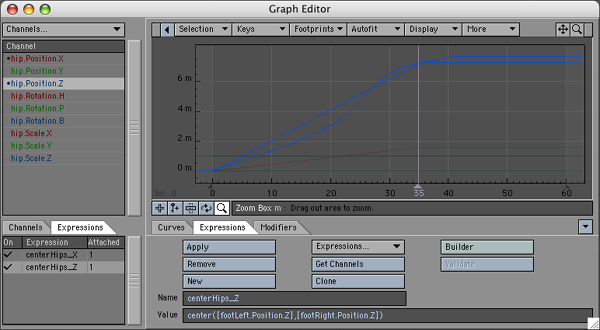
That’s it! Your hips will now remain centred between the character feet
no what the feet do.
If you look at the Utility functions in Expression builder you will notice there are several variations of hip centering which are a little more complex to set up but they give you more control over your character.
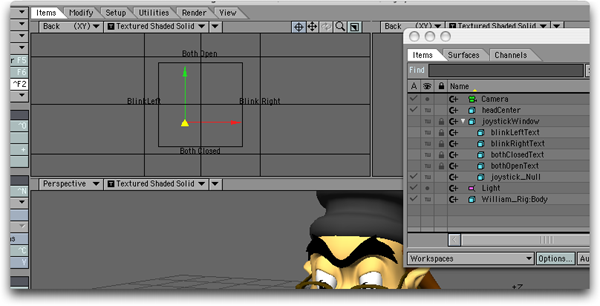
Joystick Control for morphs Expression Example
In this more advanced example we will use Expression Builder to create the expressions for a joystick control. The joystick will be used to control the blinking of a characters eyes.
Overview: We begin with a bit of an explanation of the ideas behind what we are trying to do. The blinking of characters eyes is modelled using four morphs: A left eye blink, a right eye blink, both eyes blinking and both eyes opening wide. We will control the left and right eye blinking by moving a null to the left and right respectively. The opening and closong of both eyes will be controlled by the same null, not with the left/right motion, but with the up/down motion of the null. We will call this null the “joystick” null. The big advantage of using this method is that if we move the null both sideways and up (or down) ie diagonally, then we simultaneously combine all the four morphs by using only one controller – the joystick null.
How do we achieve this with expressions?
We will use four expressions:
blinkLeft,
blinkRight,
blinkBoth and
wideOpen.
Each expression will connect the joystick
null to one of the four morph channels:
object.Body.Eyes.Blink_Left,
object.Body.Eyes.Blink_Right,
object.Body.Eyes.Blink_Both and
object.Body.Eyes.Wide_Both.
(The actual object in the screen dumps is called William_Rig.) There remains one further hurdle, when the joystick null moves, it will move a certain distance (eg 50mm), we will need to get the expression to convert this distance in to a morph percentage. When using morphs 100% is actually represented by the number 1 (and 0% by 0). Thus if we want a distance change of 50mm to correspond to a morph percentage change of 0% to 100% we will need to use a bit a maths to convert this range an range of 0 to 1. Actually we won’t need any math phew!) since there is a function called “maprange” which will do it for us.
Now, the joystick it just a null which we will move in the XY plane to control the morphs. Now, the utility of the joystick approach is greatly enhanced if there is some graphical on screen indication of which directions correspond to which morph changes, and also, were 0% position is. For this example we have created all of these using five other nulls. Four nulls are used with an “Item Shape” custom object whose only purpose is to place some text in the viewport. The last null has a square as the custom shape showing the range for the joystick (and the center). Also, all the nulls are parented to the “square window” null. This allows us to position the whole joystick control setup anywhere in the scene. For convenience, the joystick is usually placed in a viewport by itself (or alongside any other such controls)
Let's get the expressions going. We will start by creating the BlinkLeft
expression. This expression will control the closing of the left eye as
the joystick moves from O to A (see the figure).
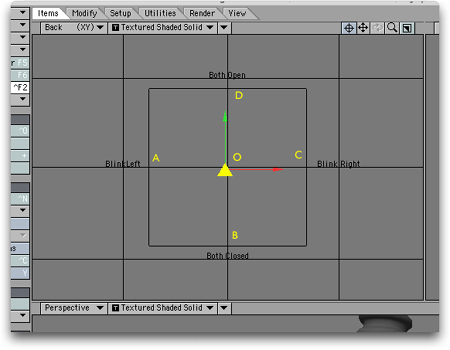
In terms of distance the null is moving from X=0 (at O) to X=-50mm (at
A) the full range of the eye closing corresponds to a morph percentage
change of 0 to 75% or, for the expression, a change from 0 to 0.75.
We will use Expression Builder (EB), so open the Graph Editor, click the
Expression Tab and click the “Builder” button. Once the EB is open use
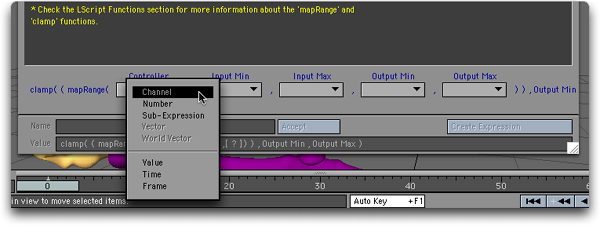
the pop-up menu to choose the “Clamped Range” utility function as shown
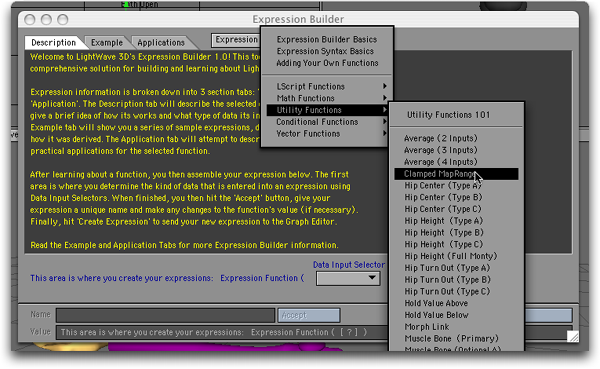
We now have an expression template with five inputs.
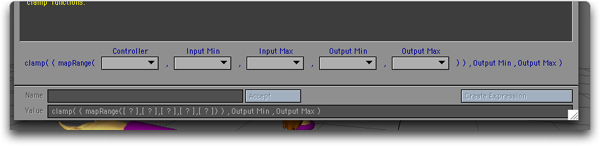
This is the function that “maps” the range of the joystick controller (ie.
–50mm to 0mm) to the range of the morph (ie 0.75 to 0.0) To use it we
need the joystick controller to go in the first input, so, select the
“Channel” from the Controller input
and then select the X position channel of the joystickControl object
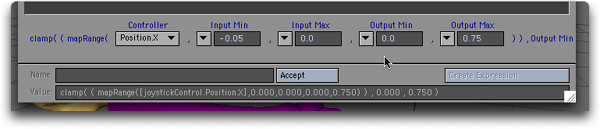
Now, the “Input Min” is the minimum value (as a number) that the joystick
controller will take. In this case it is –50mm, or –0,05. Thus, choose
the number option in the “Input Min” popup,
and enter –0.05. Similarly, for the remaining three entries: The “Input
Max” is the maximum value we expect the X coordinate of the joystick to
take (for controlling the left blink – it will actually move to +50mm
for the right blink, but for the left blink we want an X value of 0 to
correspond the 0 morph percent. Thus the “Input Max” is 0. For the “Output
Min” we want 0.75 – the morph percent that corresponds to –50mm (which
isn’t actually the smallest number, and for the “Output Max” we want 0
(giving a morph percent of 0%). Once all your number are entered the template
should look like
Now, click the “Accept” button, which tells EB to accept all your template
entries. EB usually gives the expression some generic name; so delete
it and type in “blinkLeft” for the expression name.
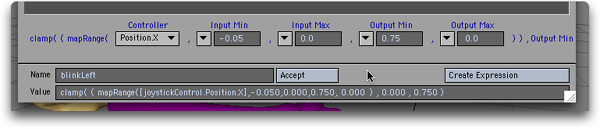
Finally, click the “Create Expression” button. This tells EB to send the
expression to Lightwave. If you now open the Graph Editor and click on
the Expression Tab you should see your expression!
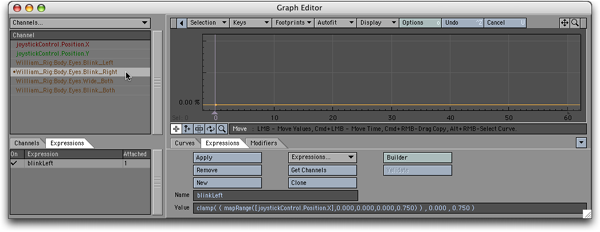
You can close the EB panel as we won’t need it till later. Back to the
Graph Editor (GE). We now have to attach or apply the expression to the
channel which it is going to control ie the left blink morph channel.
To do this you need to get the channel in to the channel bin (the list
on the top left of the GE). In
our scene the morph channel is called William_Rig:Body.Eyes.Blink_Left”.
Once it is in the channel bin select it and then click the “Apply” button
on the Expression Tab. A dot should appear next to the morph channels
name telling you it now has an expression attached to it.
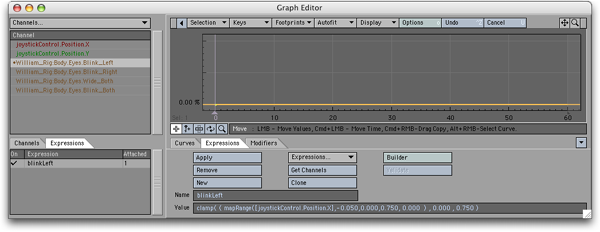
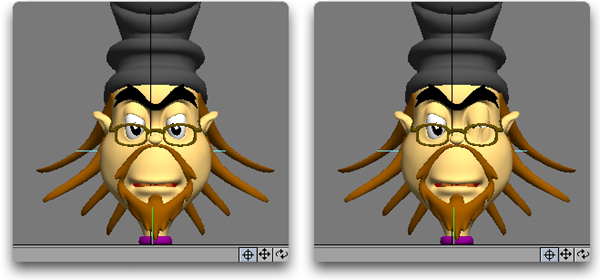
That’s it for the left eye blinking. If you move the joystick controllers
X position from –50mm to 0 the left eye should blink.
We now have to repeat three more times to create the expression to control the right blink, the wide open case and the both closed case. The process is exactly the same with only the numbers entered in to the Expression builder changing and, for the blinkboth and wideOpen cases, it is the Y position of the controller that is used. These three EB panels are show below
Blink right
Blink both
Wide Open
Once you have applied these three expressions to their respective channels
your joystick controller should be fully functional.
One last thing. Why is the “clamp” function
part of each expression? Well, the map range function can take values
outside the range of the “output” min and max values i.e. can give negative
morph percents or percents greater than 100%. This is what the clamp function
stops happening. It takes in the values of the map range function as forces
then to stay in the range of the very last two numbers in each expression
(in this case, the range 0 to 0.75)
Connecting LScripts to Expressions
You can write an Lscript function, or user defined function (UDF), using all the keywords available in LScript and then access the function in an expression.
Employing Embedded LScript, users can now write their own functions for use with LightWave Expressions.
Expressions UDFs are used just like any built-in Expressions function. Parameter passing is limited to simple data types--strings, numbers and vectors. As long as an expression evaluates to one of these data types, it can be used as an argument. Expressions UDFs are stored in the LighjtWave->LScripts directory within their own directory called "expressions". A default library of functions can be maintained within this directory called "library.ls". This library of functions is automatically loaded into the
Expressions engine when LightWave is initialized, and its defined functions are consequently available to any LightWave expression or Expressions UDFs that references them.
Additionally, individual Expressions UDFs can be stored in their own files in this same directory. The name of the file containing the UDF must exactly match that of the function name being referenced. The file may contain any number of other UDFs to support the main function, but must contain at least a UDF whose name and argument count matches that being referenced in the expression.
Data exchange between UDFs is not limited in their types. UDF-to-UDF calling is exactly the same as it is in LScript.
By way of example, assume the following files exist in the required directory:
LightWave->LScripts->expressions->library.ls
LightWave->LScripts->expressions->channelValue.ls
The "library.ls" file contains the following content:
locateChannel: fullchannel
\{
parts = parse(".",fullchannel);
group = ChannelGroup(parts[1]); // start with root channel group
lastgroup = group;
subgroup = nil;
x = 2;
while(group)
\{
// scan sub-groups to match parts[x]
// if a match can't be found, then it
// is probably the start of the channel
// name
subgroup = ChannelGroup(group,subgroup);
last if !subgroup;
if(subgroup.name == parts[x])
\{
group = subgroup;
lastgroup = group;
subgroup = nil;
++x;
\}
\}
if(!lastgroup) return(nil);
// anything left in the parts[] array are the components
// of the channel name itself. put them together for
// channel searching
channelname = ""; // avoid creating an array
psize = parts.size();
while(x <= psize)
\{
channelname += parts[x];
if(x < psize) channelname += ".";
++x;
\}
// scan the defined channels in the final group to see
// if we can match the channel name
chchannel = lastgroup.firstChannel();
while(chchannel)
\{
last if chchannel.name == channelname;
chchannel = lastgroup.nextChannel();
\}
return(chchannel);
\}
// replace the built-in clamp() function
clamp: val, lower, upper
\ {
result = val;
if(val < lower) result = lower;
else if(val > upper) result = upper;
return(result);
\}
While the "channelValue.ls" file contains the following content:
chan;
chanName;
channelValue: channel, time
\{
if(chanName != channel) chan = nil;
if(!chan)
\{
// cache the channel for speed
chan = locateChannel(channel);
if(!chan) return(0);
chanName = channel;
\}
return(chan.value(time));
\}
In Layout, you might then enter an expression like:
clamp(channelValue("WashLight.Intensity",Time),0.0,1.0)
This will invoke the channelValue() UDF, which then invokes the locateChannel() UDF (defined in the default library file "library.ls") to resolve a string channel reference to
an actual LScript Channel Object Agent. The channelValue() UDF returns the value of the specified Light Object's intensity value at the current time. This value is then passed to the (script) clamp() UDF (also defined in "library.ls") to keep it in a specified range.
Alternately, you could use the Graph Editor's direct channel reference syntax with the UDF call:
clamp([WashLight.Intensity,Time],0.0,1.0)
UDF references that have been loaded into the Expressions engine are automatically updated the next time they are evaluated when their respective files have been modified. For instance, if you have expressions referencing channelValue(), altering the last line of the function to
read:
return(chan.value(time) + 1.0);
will instantly return new values the next time the expression is evaluated (e.g., on the next frame).
\end{document}
Object References
Objects are referenced by their name. The system does not currently suport space characters (' ') in object names, so cloned objects (i.e., "Null (1)", "Null (2)", etc.) cannot be used unless they are renamed.
The "Scene" object is the only pre-defined object in the system. All other object references must equate to an object in the current scene.
Built-in Functions
double sqrt(double)
double exp(double)
double log(double)
double sin(double)
double cos(double)
double tan(double)
double asin(double)
double acos(double)
double atan(double)
int random(int,int)
double vmag(vector
| double,double,double)
(int | double | vector) abs(int
| double | vector)
double ceil(double
| vector)
double floor(double)
double cosh(double)
double sinh(double)
double tanh(double)
double mod(double
| vector,double | vector)
double pow(double,double)
double rad(double
| vector)
double deg(double
| vector)
(double | int | vector) max(double
| int | vector,double | int | vector)
(double | int | vector) min(double
| int | vector,double | int | vector)
double range (double,double,double)
double selector(double,double,double,double)
double step(double,double,double)
double round(double,int)
double frac(double)
double fac(double)
double cot(double)
double sec(double)
double csc(double)
vector cross3d(vector,vector)
double dot3d(vector,vector)
double cross2d(double,double,double,double)
double dot2d(double,double,double,double)
vector normalize(vector)
vector center(vector,vector)
vector extent(vector,vector)
string parse(string,string)
double number(string)
vector vector(string)
string string(double
+ int + string + vector)
int integer(double
| string)
string strleft(string,int)
string strright(string,int)
string strsub(string,int,int)
string strupper(string)
string strlower(string)
double randu([double
| int])
string hex(int[,int[,int
| "true" ]])
string octal(int[,int[,int
| "true" ]])
double angle(vector,vector,int)
Common Object Methods and Data (all objects respond)
vector pos(double)
vector position(double)
vector rot(double)
vector rotation(double)
vector right(double)
vector up(double)
vector forward(double)
vector pivot(double)
vector wpos(double)
vector wposition(double)
vector wright(double)
vector wup(double)
vector wforward(double)
vector limits.pos.min
vector limits.pos.max
vector limits.position.min
vector limits.position.max
vector limits.rot.min
vector limits.rot.max
vector limits.rotation.min
vector limits.rotation.max
vector limits.right.min
vector limits.right.max
vector limits.up.min
vector limits.up.max
vector limits.forward.min
vector limits.forward.max
vector limits.pivot.min
vector limits.pivot.max
vector limits.wpos.min
vector limits.wpos.max
vector limits.wposition.min
vector limits.wposition.max
vector limits.wright.min
vector limits.wright.max
vector limits.wup.min
vector limits.wup.max
vector limits.wforward.min
vector limits.wforward.max
Mesh Object Methods and Data
double dissolve(double)
int points
int polygons
Light Object Methods and Data
vector color(double)
int points
int polygons
double coneangle.rad
double coneangle.radius
double coneangle.edge
Camera Object Methods and Data
double zoom(double)
double zoomfactor(double)
double focallength(double)
double focaldistance(double)
double fstop(double)
double blurlength(double)
double fovhor(double)
double fovhorizontal(double)
double fovver(double)
double fovvertical(double)
Scene Object Methods and Data
int points
int polygons
int renderstart
int renderend
int renderstep
double fps
int width
int renderwidth
int height
int renderheight
double aspect
double pixelaspect
double aspectratio
int minspp
int maxspp
int recursion
int maxrecurse
int recursedepth
int usingTraceShadows
int usingTraceReflection
int usingTraceRefraction
int usingFields
int usingEvenFields
int usingMotionBlur
int usingDOF
int usingLR
int usingLimitedRegion
int lr.x1
int lr.left
int lr.x2
int lr.right
int lr.y1
int lr.top
int lr.y2
int lr.bottom
int limitedregion.x1
int limitedregion.left
int limitedregion.x2
int limitedregion.right
int limitedregion.y1
int limitedregion.top
int limitedregion.y2
int limitedregion.bottom
Selector/Converter items
double x
(selects the first element of a multiple-data type)
double y
(selects the second element of a multiple-data type)
double z
(selects the third element of a multiple-data type)
int r
(selects the first element of a multiple-data type)
int g
(selects the first element of a multiple-data type)
int b
(selects the first element of a multiple-data type)
vector rbg (converts a vector data into color-normalized data)
string asStr
(converts int, double, vector to string)
string asString
int asInt
(converts string, double to integer)
int asInteger
double
asNum
(converts string, int to double)
double asNumber
vector asVec
(converts int, double, string to vector)
vector asVector
Note: A vector is a group of related values. They could relate to position (x,y,z), rotation (h,p,b), color (r,g,b), etc. To get only one component, use a selector as demonstrated below.
Note: Expressions react to interactively moved items, even if Auto Key is turned off.
Note: You may use XS, YS, and ZS as aliases for Scale.X, Scale.Y, and Scale.Z.
Sample Expressions
HeadLight.rot(Time).h returns the heading rotation value of the HeadLight item at the current time.
Left.pos(Time).x + Right.pos(Time).x returns the sum of the Left and Right items positions on the x axis.
<1,2,3>.y returns 2
<1,1,1>.rgb returns <255,255,255>
<.5,.25,1>.rgb returns <127,63,255>
BackLight.color(frame / Scene.fps).rgb returns RGB vector value for color BackLight at a user-defined frame converted to a time index using the Scene object's fps setting. The frame variable is returned to the caller and can have its value explicitly set before each evaluation of the expression.
2 * "1 2 3".asVec.y returns 4
((Scene.usingLR ? (Scene.lr.right - Scene.lr.left) : Scene.width) / 2).asInt finds the horizontal center of the frame.
