
HyperVoxels
With ordinary
polygonal objects, realistic effects like liquids, smoke, clouds, and
fire are difficult, if not impossible, to achieve without HyperVoxels.
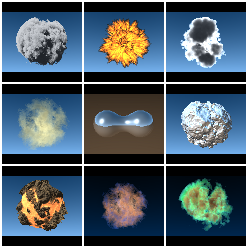
It simplifies the creation of volumetric rendering effects such as photo-realistic
clouds, flames, explosions, dust, nebulas, contrails, fluids, smoke, ash,
pyroclastics, gelatin, electro-microscopic images, rusted materials, detailed
solid and rocky surfaces, and much, much more.
HyperVoxelshave computed mass, as opposed to the modeled mass of normal
LightWave objects. This opens the door to effects an order of magnitude
greater in complexity. You can now transform objects dynamically, like
merging and slicing objects, without modeling multiple geometries. A common
example of this is the action of the substance inside lava lamps.
HyperVoxelscan be a surface, volume, or sprite. Surface HyperVoxelsare similar to standard LightWave objects. They have a defined surface, but no interior. If you go inside such an object, there is nothing. Volume HyperVoxels, on the other hand, have computed volume. You would use this option to create effects like gases, flames, clouds, explosions, or even short hair or fur. Your camera can go inside these HyperVoxelsand still see the texture. The Sprite mode is a “slice” of a volume HyperVoxel. It renders quicker, but lacks much of the volume mode’s 3-D quality.
The HyperVoxelsvolumetric filter is usually applied to a points-only object or a null object. The reason is that polygons may be visible after rendering and usually this is not desired. However, having polygons may make the object easier to see in Layout. In such cases, you can use the Unseen by Camera object property.
HyperVoxel textures are 3-D algorithmic textures, unlike normal surface bump maps, which only appear to have depth. This means you can actually get very close to the surface and the textures will look three dimensional. HyperVoxelsfeature sub-pixel displacement, which results in surface details no matter how close you get.
You can determine the position of HyperVoxels by using a null object or an object’s points. Moving the object will move the HyperVoxel object. Changing the position of an object’s internal points will also change the look of a HyperVoxel object. HyperVoxelswill appear around each point and their proximity to each other affects how the object appears on the whole.
A particle animation system is not required. You can achieve many spectacular effects using null objects or points animated by conventional means. However, to achieve realistic dynamic liquid effects, you will probably need a LightWave particle system, like Particle FX.

Note: HyperVoxelobjects exist just as
normal objects do. Thus, they cast shadows, are reflected, and so on.
However, currently, plug-ins donot have access to all lighting information.
As a result, HyperVoxelswill continue to receive shadows, even if the
Receive Shadows option on the Object Properties panel is disabled.
HyperVoxels and Transparent Surfaces
Because volumetrics are ray-traced, to see a HyperVoxel behind a transparent surface, you must ray trace transparent surfaces. You can do this by simply activating the Ray Trace Transparency option on the Render Options panel. However, this is not necessary if the Refraction Index of the object’s transparent surface (Surface Editor) is set greater than 1.0 (even 1.001) and Ray Trace Refraction on the Render Options panel is enabled.
Also, if you want to see an object behind a transparent HyperVoxel surface, you need to set the Refraction Option to Ray Tracing + Backdrop on the HyperVoxels Shading, Environment tab.
Jump-starting with HyperVoxels
Here are some short exercises to jump-start you with HyperVoxels—more complex tutorials are included later.
This exercise gives you a quick hands-on feel for how to use HyperVoxels.
1. Add a null object to an empty Scene in Layout.

2.
Add Hypervoxels from the Add Volumetric drop down menu (Window > Volumetrics and Fog Options). Open
the HyperVoxels settings panel by double clicking on it in the list.
3.
On the HyperVoxels panel, double-click on the null in the list window.
This will activate HyperVoxels for this object. A check will appear to
the left of its name. (You could also select the object and click the
Activate
button.)

4. Object Type
should be set to Surface. When you activate
an object, the automatic size function is performed. The value 1m should
appear in the Particle Size field.

5.
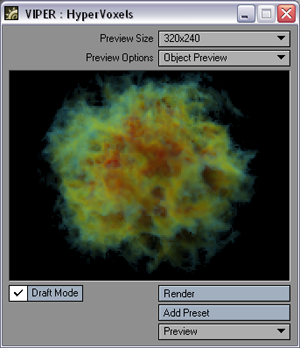
Make sure the Automatic Preview options are
active so we can see the results of your efforts. Automatic Preview
updates the preview as you make changes, so you don’t have to keep clicking
Render.


Open VIPER (the button is on the main Layout toolbar). You should already
see a rather dull ball in the VIPER window—of course it’s a lot more interesting
than a rendered null.
Note: You can preview animated textures with VIPER. Remember that VIPER uses the camera view, so make sure the camera can see your particles.
6. Change the Particle size to 2. The ball should be larger now. (Would you believe twice as big?) Activate the Draft Mode to speed VIPER up if you would like to.

7.
Click on the HyperTexture tab. This is where you define the surface texture—essentially
the terrain of the surface. Select FBM from the Texture
pop-up. Notice that this is similar to setting a surface procedural texture.

VPER
Render
Go ahead and play around with the various settings on this tab and watch the HyperVoxel change.
You can actually apply all of the standard surface attributes to HyperVoxels on the Shading tab. All of the settings should be familiar to you since they are identical in name and operation to the normal LightWave surface settings. Try changing the various values and see their effects on VIPER.
Exercise: HyperVoxelvolumetrics
This exercise will give you a flavor for some of the volumetric features.
1. Using the HyperVoxel from the previous exercise, change the Object Type from Surface to Volume.

2.
Go to the HyperTexture tab and select Turbulence as the Texture.
You should now see a nice wispy volumetric cloud. This object is totally
three dimensional. You could fly the camera into it and continue to see
all of the details. How cool is that?!

3.
Let’s add some color. Go to Shading
tab > Basic
tab
and click the Color Texture button.
4.
Change the default Layer Type to a Gradient
and use Local Density as the Input Parameter.
This will apply the gradient based on the density of the cloud.


5.
Create three keys: blue, yellow, and red, top to bottom. You will see
VIPER updating the preview as you make changes. Click Use Texture
to close the panel when you are done.
6.
The options on the Shading tab
> Basic tab
control the basic look of your volumetric HyperVoxel. You can adjust the
color, opacity, and density. The lower half of the tab controls the fractal
look of the object. Try playing with the settings to see their effects.
7.
Click on the Advanced sub tab. As you might expect, this tab contains
more advanced options. Included are options to define how the HyperVoxel
object is lit, as well as self-shadow options.
8. Try messin’ with the various setting, including the Sprite mode.
Exercise: blending HyperVoxel objects
This exercise
shows how different HyperVoxel objects can interact with one another..

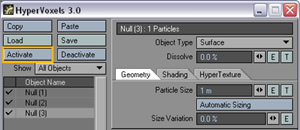
1. Add three null objects to an
empty Scene in Layout.
2. Move and keyframe Null (1) to Y = 1m and Null (3) to Y = -1m
3. Choose Window > Volumetrics and Fog Options to open its panel.
4.
Activate HyperVoxels for all three objects.
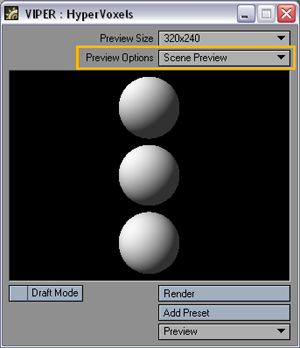
5.
Open VIPER and set Preview Options to Scene Preview.
This will give us a preview of all of the HyperVoxel objects in the scene.
 6.
Select Null (1) and choose New
Group
from the Blending Group pop-up menu
on Geometry tab. Accept the default name Blend Group (1) by clicking OK.
6.
Select Null (1) and choose New
Group
from the Blending Group pop-up menu
on Geometry tab. Accept the default name Blend Group (1) by clicking OK.
7.
For each HyperVoxel set the Blending
Group to Blend Group (1) and the Blending
Mode to Additive (Geometry
tab). By placing all of the HyperVoxels in the same group, they can interact
with each other.

8. Try changing the Color
(Shading tab > Basic tab) of each null and giving them Texture
(HyperTexture tab).


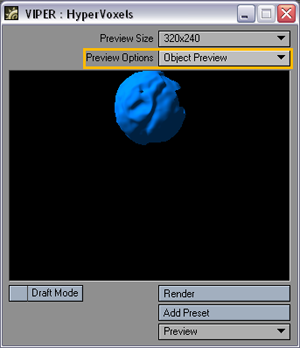
Preview Options
When used with HyperVoxels, the Preview Options pop-up menu on the VIPER window has some options. Object Preview gives you a preview of the selected HyperVoxelobject only from the camera’s perspective.

Scene Preview
will show you all HyperVoxelobjects visible from the camera’s perspective.

Particle Preview
will give you an enlarged view of a single particle, which is particularly
helpful if your HyperVoxelobject consists of many particles.
Use Z-Buffer
The Use
Z-Buffer in Preview option
(on the main HyperVoxelpanel) allows you to preview your HyperVoxels in
the last rendered frame. (Note: Object
Preview or Scene Preview
modes only.) This requires that the Enable
VIPER option be active on the Render Options panel.


Sprite Texture Resolution
The Sprite Texture Resolution setting (on the main HyperVoxelpanel) is a display setting and does not affect your rendered HyperVoxelsnor VIPER. It allows you to set the quality of textures used on HyperVoxelparticles in Layout.
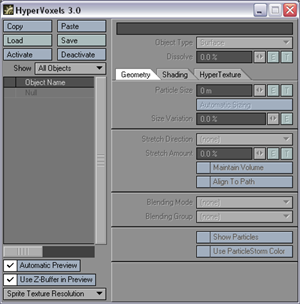
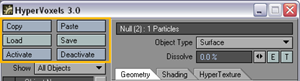
HyperVoxels Setting Management
Load/Save buttons allows you to retrieve and store HyperVoxels setting files. This can be used to create a library of attributes.
Use the
Copy
button to copy the settings for the selected HyperVoxel object to a memory
buffer. These can be pasted to the currently selected HyperVoxel object
using the Paste
button.
You can enable/disable HyperVoxels for an activated object by clicking in the checkmark column and you will not lose your settings. The Activate button will activate the selected object and set all settings to their defaults. The Deactivate button places the object in an inactive default state. With Activate and Deactivate, you will lose any existing settings.
If the Show pop-up menu is set to All Objects, then all objects in the scene will be listed. HyperVoxels Only will list only HyperVoxelobjects; however, this includes disabled HyperVoxelobjects.
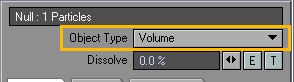
Object Type
The Object Type pop-up menu lets you choose between the previously demonstrated Surface, Volume, and Sprite HyperVoxel modes. Use it for testing purposes when you are developing your HyperVoxelanimation.

Dissolve
lets you individually set an opacity value for each active HyperVoxel
object: 0% is totally opaque and 100% is completely transparent.
Sprites
The Sprite mode is a simplified two-dimensional slice (or slices) of a HyperVoxel, so it can quickly produce results to give the user a fast sketch of the HyperVoxel’s rendered appearance. You might think of it as a slice of a Volume that has been mapped on a polygon that always faces the camera.
You may want to use Sprite to accelerate the setup process for Surface or Volume modes. It’s even great for instances where you don’t need a full 3-D volumetric effect, like a smokestack in the distance.
Although Sprites are two-dimensional in nature, you can still fly a camera through them. The sprite will begin to dissolve when the camera gets into it and eventually fully dissolve when the camera hits the slice.
Geometry Tab
Enter a specific radius for the individual particles in the Particle Size field. Click Automatic Sizing to compute an average size—this is a handy way to find a starting point. The average particle size is based on the shape of the entire object—HyperVoxels surfaces will not intersect at this setting.

Note: When you first activate an object,
automatic sizing is performed for you.
Rendering time is related to how much the particles intersect each other—the more intersections you have, the longer the rendering time. For fastest rendering, always try to use the fewest number of particles and the smallest Particle Size that achieves acceptable results.
Size Variation sets the maximum percent that the particle size can vary. For example, a particle size of 1m with a variation of 100% can be as small as 1m and as large as 2m. Using a variation of 50% would yield particles ranging from 1m to 1.5m in size. Use this setting to create random disturbances in the surface.
Stretching and Rotating HyperVoxels
You can stretch HyperVoxelson a selected axis or based on velocity (Stretch Direction). The amount of stretching is determined by the Stretch Amount setting, which may be animated. When using nulls, you may stretch HyperVoxelsby animating normal Layout XYZ size values.


Left:
Without Stretch Direction, Right With Stretch Direction
Hypervoxels also respect the rotation of the object.
The Maintain Volume option on the HyperVoxel panel Geometry tab,will cause the HyperVoxels to maintain their volume. This means that when they get squashed, they will maintain the same area.
Align to Path
Align to Path causes the HyperVoxels to rotate as they follow a path. This can be particularly important when using particles.
Blending HyperVoxels
Separate HyperVoxelitems can interact with one another. You can individually set how the selected object interacts with other HyperVoxel objects. In order for HyperVoxels to interact:
All must belong
to the same Blending Group
All must have a Blending Mode selected
To view with VIPER, you must have Scene
Preview set as the Preview Options
Here, the two objects are shown separately


Left:
Object 1, Right: Object 2
(none) means it will not interact with other HyperVoxel items.


No
Blending Object
1 Additive, Object 2 Additive
Additive will smoothly blend HyperVoxels.

Object 1 Additive, Object 2 Negative
Negative will make the object push away portions of other HyperVoxel items that it comes in contact with—sort of like an animated boolean effect.

Object 1
Additive, Object 2 Effector
Effector is kind of a cross between Additive and Negative.
A Blending Group is the group of HyperVoxelobjects that you want to interact with each other. You can select an existing group or create a new one.
Show Particles
The Show
Particles option will display a bounding sphere in viewports.

Use ParticleStorm Color
The HyperVoxels will use the color from Particle Storm particles, if available.
Note: The HyperVoxels Particles Displacement
plug-in lets you set the HyperVoxels particle base color to that of the
vertex color map, if one exists.
 Shading Tab: Surface
Mode
Shading Tab: Surface
Mode
The parameters on the Shading tab work just like their cousins on the Surface Editor.
Self Shadows lets the HyperVoxel cast shadows on itself. (The HyperVoxel will cast shadows on other objects in the normal way.) Full Refraction forces rays to bounce each time a new refracting (i.e., transparent) surface is found. If this option is inactive, one refraction bounce is computed, which is enough most of the time. Full Refraction will, of course, increase render time, but will result in more sophisticated effects.
HINT: You might try the (faster-rendering)
corresponding bump textures on the Shading tab without HyperTextures,
if you don’t need the true surface details. Remember this: “Don’t get
hyper if bumping will do” or “A bump in the night is not worth getting
hyper over.”
 Shading Tab: Volume
Mode
Shading Tab: Volume
Mode
The options on the Shading tab are different for Volume Hypervoxels, which are gas- or cloud-type effects. Use Color, Luminosity, Opacity, and Density settings to change those parameters for the volumetric object.
The Thickness setting, which defaults to 50%, lets you adjust the general heaviness of the volume. Higher Smoothing values yield less of a hard-edged look and volumes will appear more wispy.
Baking HyperVoxels
The baking feature subdivides HyperVoxels into a 3-D grid of subvolumes(a space subdivision). This dramatically reduces the necessary computations and allows preprocessing of the HyperVoxel effect, including shadows, textures, and so on. The result is essentially a stack of image maps.
Click the Options button to display the baking options. The size of the “image map stack” is set on the Resolution pop-up menu. The first two numbers define the size of the images and the third defines the number of frames.
Enter the name
of the file to save in the Filename
field. The animation codec (File Type)
used when saving the volume data is very important. By default it uses
QuickTime uncompressed because this format preserves the alpha channel.
This is important because the alpha channel encodes the volume opacity
information. Many codecs don't handle the alpha channel properly and the
opacity information will be compromised. (Note that you could edit the
file externally in another program or even create one from scratch.)

Click Bake Object to execute the
baking computation. When complete, you should notice that most of the
normal settings will be ghosted except for some basic ones like Color, Luminosity,
and so on. These can be adjusted to change the look of the baked object.
Volume Mode Advanced Sub-tab
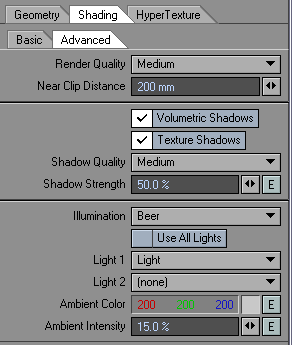
The various items on the Render Quality pop-up menu determine the level of detail HyperVoxels uses to render the volume. The default is Medium and should be adequate for most situations. Near Clip is the distance from the camera where the rendering starts. The default value is normally fine. A lower value will render finer details, but take longer to render. You might adjust this setting if the camera was inside a cloud. It really depends on the scale of the HyperVoxel objects and the scale of the details you want to see.

The Volumetric Shadows option creates shadows within the volume, which add detail and realism. However, it can increase render time significantly, especially when you are trying to simulate very dense clouds, like volcanic smoke. The Texture shadows option yields a very realistic shading of the hypertexture, but increases rendering time significantly. If you disable this option, you will miss all of the hypertexture shadow details.
Use the Shadow Quality pop-up menu to choose the render quality of the shadows. The Shadow Strength sets the darkness of the shadows.
The Illumination pop-up menu determines how the HyperVoxelsvolume is lighted. Self acts as if the light comes from the viewer. It can be useful to see more details on the object. With Constant, the scattering of light is constant, that is, the amount of light scattered at one point is proportional to the amount of light received at that point.
Rayleigh simulates a strong forward scattering of light within the volume. Light scatters in the direction of the light relative to the viewer, which means that illumination will be at its maximum when the light faces the viewer. This is perfect for back-lit clouds, smoke, and so on.
Beer uses the pattern’s sample density amount as the illumination value, dramatically reducing contrast between lighted areas. The setting uses the physical model for scattering of light inside a gas, and is a good setting for clouds. For a more “cartoony” look, try CelShade.
You can choose to have all lights affect the HyperVoxel with Use All Lights, or choose one or two specific lights.
HINT: Try to avoid using these Light options, if you are ray tracing shadows. Ray-traced shadows on volumetrics is incredibly computationally intensive and will often result in unacceptable rendering times. A single pixel in volumetrics requires 20 or more samples and a shadow is ray traced for every sample. Try to fake lighting with Ambient Intensity and surface Luminosity or use shadow map Spotlights.
Ambient Color lets you specify the ambient light color of the volume. This setting works hand-in-hand with the Color setting on the Shader tab.
Ambient Color is similar to ambient light in Layout, except it applies only to the selected HyperVoxelobject. Basically, the shading process is very similar to what happens with regular object surfaces.
Because of the way illumination is calculated inside volumetrics objects, Ambient Intensity can be higher than 100% without overexposing the image.
![]()
Shading Tab: Sprite Mode
The options on the Sprite mode Basic subtab are similar to the options available for the Volume mode. This makes sense since the Sprite mode is just a slice of a Volume mode HyperVoxel.
![]()
Density on sprites is a multiplier
for both Opacity and Luminosity.
It is essentially the opposite of Dissolve.
With the Number of Slices setting, you can “thicken
up” the effect by increasing the number of slices used for sprites from
the default setting of 1. This allows you to get something a little closer
to the Volume mode while still retaining the speed of the Sprite mode.
![]()
![]()
Left: 1-Slice, Right: 3-Slice
You may choose to light the Sprite using all lights in your scene or up to two specific lights.
![]()
On the Clips subtab, you can map an image directly onto a sprite using
the Add Clip button. Any image
available to the scene may be selected. Use the Image Editor to load an
image not already available.
Clips are added to the HyperTexture. If you want to see only the clip, set the Texture option to (none) on the HyperTexture tab.
![]()
Some options on the Alpha pop-up menu let you cut away parts of the image you don’t want to use. If the image file includes an alpha channel, choose Embedded to use the alpha channel. Use Luminosity to leave brighter parts of the image. The Black mode will cut away black areas. The Threshold level like you increase the range for what is considered black.
The Rotation setting sets a rotation speed for your clips. This is perfect for effects like billowing smoke and explosions. The higher the setting, the faster the rotation. Positive values make the clip rotate clockwise. Rotation always faces the camera.
If you do not want to use the color information in the image, uncheck Use Color. Then, only the grayscale information will be used.
Anti-Aliasing will yield better-looking edges, but it significantly increases render time and memory requirements.
When Solid is checked, the sprite is rendered as a solid object, preventing the normal additive result of overlapping sprites.
Sprite Clip Frame Offset
If you use HyperVoxels with particles, you can use multiple clips. The Frame Offset setting determines how you want to map an image sequence to a given particle. Particle Age starts the sequence for a particle at birth. Thus, the image will likely be different for particles at a given frame. Uniform will use the layout time as the time in the sequence. Thus, the image used is the same at each frame. When the bottom of the list is reached, it starts again from the top. Random will assign a random offset to each particle.
Frame Offset is an important control for sprite animations. It allows you to decide how to attach images to particles. Particle Age is probably the most useful. You can have literally hundreds of particles, each mapped with distinct image sequences. For example, you could have particles with independent water-splash image sequences, creating a complex and rich visual effect.

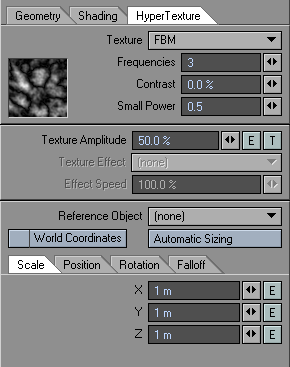
HyperTexture Tab
The Texture pop-up menu determines what the texture will look like. The textures in this menu correspond to the identically named procedural textures, although not all of them will be available here.
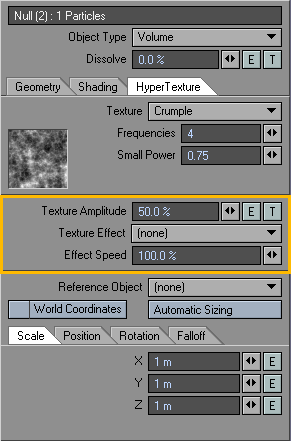
The big difference is when you are using a Volume
(Object Type) HyperVoxel. In this case, you can animate the texture
effect.
In the Texture Effect pop-up menu you have several options. Turbulence makes the texture move towards the viewer. It is like animating a texture with the texture velocity parameter. Billowing animates the texture by rotating outward along a velocity vector (à la Dante's Peak). It is very good for explosions. Displace adds variations to the texture. The effect is best seen when the texture is moving. Dissolve gradually lowers density, making particles disintegrate.
Velocity Translate moves the texture in the direction of the particle velocity. Since each particle has a different velocity, this can result in a cool and complex texture motion. Dissolve & Expand might be used on explosions. It dissolves the effect as it expands. Some trial and error may be necessary to get the desired look.
The Effect Speed setting is the duration of the looping cycle. The value is equal to a percentage of Layout’s Default units, on the General Options tab of the Preferences panel, per frame.
Note: Animated textures can be previewed with VIPER.

Gradient Input Parameters
Special Input Parameters will be available for texture gradients on HyperVoxel parameters. Particle Age is simply the age of (Particle FX) particles, in frames. Particle Speed is the particle speed in default LightWave units (usually meters) per second. Use Time to change the setting over a range of frames.

The Particle Weight Input Parameter
is used with regular objects that use HyperVoxels and requires them to
have a weight map. The object must also have the HyperVoxels Particles
Displacement plug-in added. Set Particle
Weight should be checked and the weight map selected.

To use the Particle Weight Input Parameter:
1. Create an object in Modeler.

2. Create a weight map and add
some random weighting to the points.
3. Load the object into Layout.
4. Choose Window > Volumetrics and Fog Options
5. Open the HyperVoxels panel and activate the object.
6. Open the object’s Properties panel, add the HyperVoxels Particles Displacement plug-in.
Open its options,
activate Set Particle Weight and
choose the weight map.
 7. On the HyperVoxels
panel, add a texture to the Particle
Size and set the Layer Type
to Gradient. Choose Particle
Weight as the Input Parameter.
Create some keys.
7. On the HyperVoxels
panel, add a texture to the Particle
Size and set the Layer Type
to Gradient. Choose Particle
Weight as the Input Parameter.
Create some keys.
For HyperTexture and Shading settings, gradient textures can use a distance to particle (along a specific axis) input parameter. This is the surface distance from the actual particle position along the selected axis.
