
Layer Type: Procedural Texture
An alternative to using an image as a Texture is to use built-in mathematical computations called Procedural Textures. These serve the same purpose as image maps; however, since they are mathematically computed they are applied seamlessly on a surface. Thus, you do not need to worry about a projection method.


All surfaces in the images above were created with procedurals.
Note: All Procedural Textures are available
for use on each surface attribute.

To add a procedural texture layer:
Click on the Add Layer button and select Procedural from the pop-up menu. You can also change an existing layer’s type by changing its Layer Type to Procedural Textures.
Note: Generally, you cannot see procedural textures in a viewport. However, see Chapter 14 for a procedure to use the TextureFilter filter to make this possible.
Texture Color and Texture Value
Unless you are adding a texture to surface Color, you must specify a Texture Value, which is the value for the texture pattern at its most intense points. This can even be a negative value.
If you are adding a texture to surface Color, you do not define a value but a Texture Color. The color chosen here will be the color of the texture at its most intense points.
Unless the texture pattern fills all of the surface area, there will be transparent and semi-transparent areas, revealing underlying layers. In areas where the texture is below 100%, the texture will blend with underlying layers.
You can change the background color used in the thumbnail window by right-clicking on it—a color selection dialog will appear. You can also drag the texture around with your LMB.
Texture Scale
Generally, you want your scale to be a fraction of the surface size to properly see the texture on the surface. Unless you know the exact dimension of your surface, it may be handy to click Automatic Sizing first and then modify the resulting Scale values.
HINT: Use LightWave’s math feature and append, say, “/4” to the automatic-sizing values. This divides the value by four. For example, adding “/4” to a value of “24 m” would look like “24 m/4” (don’t enter quotes). When you move to the next field the result is calculated automatically!
Procedural Texture Settings
The following
is a list of the Procedural Textures. Remember that although they are
described in essentially surface color terms, they can also be used for
Diffuse, Specularity, Transparency, and so on.
 Brick
Brick
Brick produces an array of symmetrically spaced bricks. The Texture Color
is the color of the mortar. Mortar
Thickness
determines the width of the mortar. At 1.0, no brick is visible. Fuzzy Edge Width
makes the outer dot edges soft and faded. Since procedural textures are
three-dimensional, you may need to tweak size and position values if a
surface cuts through mortar and that is all you see on an edge.
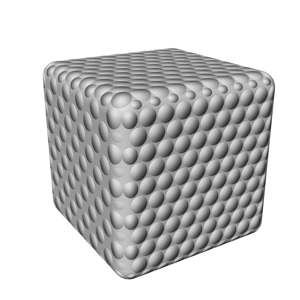
Bump Array
Bump Array produces an array of symmetrically spaced circular dots that appear to have depth. You can use this texture to create a golf ball surface.
Radius sets the radius of each bump used in the bump array pattern. Spacing sets the spacing between each bump.

Checkerboard
Checkerboard generates a tiled appearance on an object’s surface, like that of a checkerboard or chessboard. Your XYZ Scale values set the size of each square in the pattern. For example, to see ten checkerboard squares on the surface of an object, divide its length by ten. A 50-meter cube would yield a Scale of 5 (for X, Y, and Z) to achieve ten squares.

Crumple
Crumple is a very detailed texture that gives the appearance of a surface that was crumpled under pressure. You can use it to simulate crumpled paper, hammered metal, ice cubes, stucco, and even cauliflower.
Frequencies refers to the number of different scales of detail added to the pattern. A value of 1 makes a surface appear partially crumpled so that it has only a few large dents. A value of 5 makes a surface appear very crumpled so that it has many smaller dents.
Small
Power affects the appearance of the large and small features added
to a surface. The default values create the appearance of a surface with
large and small dents. A higher Small
Power (1.0 or above) causes the smaller dents to be shaded with
the same degree of intensity as the larger dents so that the surface becomes
busier and the larger dents lose some of their distinction. A lower Small Power (under .50) makes for less
distinction between the large and small features.

Crust
Crust is one of the more complex textures. It produces raised circular splotches on a surface. This is good for barnacles, warts, or moon craters.
Coverage determines how much of the crusty pattern covers the surface. A low value (0.0 to 0.5) makes many small islands of crust across the surface, whereas if you use a high value (0.6 or higher) the crust pattern begins to cover the surface color underneath.
The patterns that display Ledge Level are shaded so that the surface appears to have raised edges. Ledge Level shifts the position of the ledge that defines the edges of the pattern further outward from the pattern itself, into the surface color. The values that make visible changes in these patterns are subtle, so change them in small increments until you understand their effects well (on the order of 0.1 at a time).
Ledge
Width alters the apparent depth of the valleys
formed by the ridges in the pattern. The values that make visible changes
in these patterns are subtle, so change them in small increments until
you understand their effects well (on the order of 0.1 at a time). Ledge Width will affect the sharpness
of the slope falling off of the discoloration pattern. The default values
create a ridge just along the outside of the pattern discoloration. Higher
values move the ridge further outward from the pattern, lower values move
it inward. Most useful values will fall between 0.3 and 1.0.

Dots
Dots produces an array of evenly spaced dots. The dots can optionally have a soft edge. Dot Diameter determines the size of the dots in the dot pattern. At 1.0 the edges of dots will touch. Fuzzy Edge Width makes the outer dot edges soft and faded
 FBM
FBM
FBM is another fractal pattern that uses the same settings as Fractal Noise.
Fun Facts: Fractional Brownian motion (FBM)
is named after botanist Robert Brown, who observed the random movement
of pollen grains. Einstein later explained that the movement was due to
surrounding molecules moving in random directions.
 Fractal Noise
Fractal Noise produces a random fractal pattern. It is undoubtedly the most commonly used texture, since it can quickly mask somewhat the computerized look of 3D imagery. Use this as a bump map for terrains and brushed metal (use an exaggerated value along the grain direction). As a transparency map, Fractal Noise can generate realistic-looking clouds. As a surface color (or diffuse) map, it can give a weathered look to surfaces, such as grass or dirt ground. You’ll find numerous possibilities for this texture. (Also see the Turbulence texture.)
Frequencies affects the level of detail produced in the noise pattern. Increasing this level will increase the variation in the pattern. Values above 6 are not useful (the level of detail is so small it may not be noticeable, and it will increase rendering time unnecessarily). Contrast adjusts the blending of the texture. The higher the level (above 1.0), the greater the contrast, and the more pronounced the pattern. Values lower than 1.0 (between 0 and 1.0) produce a less stark, more softly blended pattern. Small Power refers to the amount of intensity applied to both large and small details. It changes the intensity of the smaller details. A higher Small Power (1.0 or above) causes the smaller dents to be shaded with the same degree of intensity as the larger dents so that the surface becomes busier and the larger dents lose some of their distinction. A lower Small Power (under .50) makes for less distinction between the large and small features.
Use very small XYZ Scale values in a bump map to add random pits to surfaces.
Note: The Fractal Bumps option in previous
versions of LightWave—only available for bump maps—was really Fractal
Noise with Contrast and Small Power set to .5.
 Grid
Grid
Grid generates a grid across an object’s surface. The grid is a three-dimensional grid. Therefore, lines project into all three dimensions. Often, you want a 2D grid superimposed on an object’s surface, like graph paper. In such cases where you use the grid texture and see unwanted portions of the grid showing up, try expanding the size of the grid texture along that axis (this expands it off the surface of the object). For example, if you map a grid onto a one-meter ball, the texture scale of the Z axis can cause the appearance of ripples that break up the nice graph paper look of the X and Y texture scale. Using a texture scale of 0.25m, 0.25m, 1m will get the proper look.
The Line
Thickness value determines the thickness of the lines in the grid
pattern.

HoneyComb
HoneyComb produces a hive of activity in the form of a honeycomb (won’t cha be my baby...). The Texture Color is the color of the lines. Line Thickness determines the width of the lines. Fuzzy Edge Width makes the outer dot edges soft and faded.

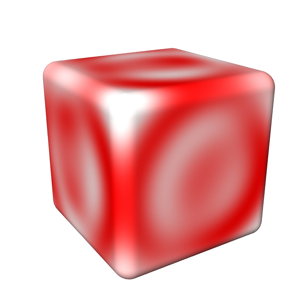
Marble
Marble produces fractal-like patterns that imitate marble veins. The pattern is calculated in veins that wrap around a selected axis, much like rings wrap around the center of a tree.
Frequencies sets the level of detail produced in the pattern. The higher the value, the better-looking the pattern becomes, but the longer the rendering time as well. (A value above 6 is not useful here, because the variance is microscopic in size and virtually invisible.) The Turbulence value should be a fraction (often one-half) of the Vein Spacing value. It determines how close a vein may come to a neighboring vein. Vein Spacing sets the distance between veins in the marble pattern. Vein Sharpness sets the level of blending/contrast of the pattern. The lower the value, the more blending that will occur. Higher values will produce very sharp, distinct veins.
HINT: Select a Vein Spacing and Texture Axis
that you like first, then set Frequencies, Turbulence, and Scale afterward.
 Ripples
Ripples and Ripples2 produce the appearance of fluid waves or ripples to a surface. Use small ripples to simulate water, or large ripples to put a wave in a flag.
Wave Sources determines the number of ripple sources. The higher the value, the greater the number of areas rippling with waves. A value of 1 will create a single ripple pattern, like that of a solitary water droplet falling into a pond. Values higher than 16 are not recommended; they require longer rendering time and may not add to the appearance of the texture.
Wavelength controls the distance between the ripples. The lower the value, the closer the waves will appear to each other. Wave Speed sets the speed of the ripples.
Looping Wave Ripples
In order to loop the movement of ripples
throughout the course of the animation, use this formula to determine
the proper Wave Speed: Wavelength
divided by the number of frames over which the pattern should loop equals
the Wave Speed (i.e., Wavelength/#
of frames to loop = Wave Speed).
Smoky 1, 2, and 3


Smoky 1 Smoky
2

Smoky 3
The Smoky textures use the same settings as Fractal Noise with the addition of a Turbulence control, which lets you adjust the pattern disturbance.
 Turbulence
Turbulence combines fractal noise layers, each at a different scale (or frequency). It produces an effect very similar to Fractal Noise, but will normally yield more eye-pleasing results. It also gives better control over the range of frequencies found in the noise, from smooth to detailed, grainy textures, due to the small scale noise that is added in. The settings are the same as those for Fractal Noise.

Underwater
Underwater produces the rippling pattern effect of refracted light, much like you see on the bottom of a swimming pool. You can also use this texture to simulate nighttime sky effects such as the Aurora Borealis, changes in cloud patterns, or even electrical shocks.
Note: You can generate actual real world effects by using Layout’s Caustics feature (Lights > Global: Global Illum), but rendering times will be significantly greater.
Wave Sources determines the number of ripple sources. The higher the value, the greater the number of areas rippling with waves. A value of 1 would create one ripple. Values higher than 16 are not useful. Wavelength controls the distance between the ripples. The lower the value, the closer the waves will appear to each other. Wave Speed sets the speed of the ripples. Band Sharpness sets the level of blending/contrast of the pattern. The lower the value, the more blending that will occur. Higher values will produce very sharp, distinct bands.
Looping Wave Ripples
In order to loop the movement of ripples throughout the course of the animation, use this formula to determine the proper Wave Speed: Wavelength divided by the number of frames over which the pattern should loop equals the Wave Speed (i.e., Wavelength/# of frames to loop = Wave Speed).
Value
The Value
procedural lets you create a layer of uniform value or color. You can
use this to composite layers with alpha channels.

Veins
Veins produces a series of raised areas separated by canals or veins. This is great for cracked mud, leaded glass, stone walls, leaves, and so on.
Coverage determines how much of the vein pattern covers the surface. A low value (0.0 to 0.4) applies the vein color only to veins themselves, whereas a high value (0.5 or higher) causes the vein color to fill in between the veins, overtaking the surface color underneath.
The patterns that display Ledge Level are shaded so that the surface appears to have raised edges. Ledge Level shifts the position of the ledge that defines the edges of the pattern further outward from the pattern itself, into the surface color. The values that make visible changes in these patterns are subtle, so change them in small increments until you understand their effects (on the order of 0.1 at a time).
Ledge
Width alters the apparent depth of the valleys
formed by the ridges in the pattern. The values that make visible changes
in these patterns are subtle, so change them in small increments until
you understand their effects (on the order of 0.1 at a time). Ledge
Width affects the depth of the veined ridges. Values just above
the default setting have the most visible effect. The default values create
a ridge just along the outside of the pattern. Higher values shift the
ridge further outward from the pattern, lower values move it inward. Most
useful values fall between 0.2 and 1.0.

Wood
Wood is similar to Marble, but produces a pattern imitating the rings in a piece of wood.
Frequencies sets the level of detail produced in the pattern. The higher the value, the better-looking the pattern becomes, but the longer the rendering time as well. (A value above 6 is not useful here, as the variance is microscopic in size and virtually invisible.) The Turbulence value should be a fraction (often one-half) of the Ring Spacing value. It determines how close a wood ring may come to a neighboring ring. Ring Spacing sets the distance between rings in the pattern. Ring Sharpness sets the level of blending/contrast of the pattern. The lower the value, the more blending that will occur. Higher values will produce very sharp, distinct rings.
HINT: Start by selecting a Ring Spacing and Texture Axis that you like first, then set Frequencies, Turbulence, and Scale afterward.
Additional Procedural Textures
A number of additional procedural textures are available; these textures are based on the noise and fractal routines presented in the textbook Texturing and Modeling: A Procedural Approach by David Ebert, F. Kenton Musgrave, DarwynPeachey, Ken Perlin, and Steve Worley (Morgan KaufmannPublishers, 2nd Ed., July 1998, ISBN 0122287304).
Fractals are the most commonly used tool in computer graphics for adding visual complexity to 3D surfaces. Fractals create this complexity by repeating a common underlying noise pattern at various scale sizes, and accumulating those scaled patterns into a final surface texture.
The following parameters are common to most of the following procedural textures:
Increment controls the fractal dimension of the texture. When set to zero, the fractal function looks like white noise. As the value gets larger, the fractal will become smoother.
Lacunarity is the amount of change in the frequency of noise that occurs between each successive iteration of the fractal calculation. As this parameter increases, the average size of the gaps between the scaled patterns will also increase.
Octaves are the number of times the texture is scaled down to a smaller pattern, and added back again to the larger pattern. Larger values add more small details to the final texture, but also increase rendering times.
Offset exists in all the multi-fractal procedurals (where the fractal dimension varies throughout the texture). When set to zero, the fractal dimension will change greatly throughout the texture. This causes the roughness of the texture to vary greatly across the surface of the texture. Larger values cause the roughness (or smoothness) to be more consistent across the entire surface of the texture.
Threshold specifies a threshold value that is used to determine whether the texture should be displayed or not. If the procedural texture value is higher than threshold, that value modifies the surface. If the procedural's texture value lower than threshold, that value does not alter the existing surface attribute at all.
Noise
Type uses Perlin noise as the most common and fastest noise function
available in these procedurals. The other options (Value, Gradient, Value-Gradient,
Lattice Convolution and Sparse Convolution) are different implementations
of noise written by DarwynPeachey and described in chapter 2 of Texturing and Modeling: A Procedural Approach,
referenced above. While these implementations may provide better quality
noise, they are definitely slower than Perlin Noise.

Coriolis
Coriolis is a texture used to simulate the shearing effect of the atmospheric flow on earth caused by the earth spinning faster at the equator, and slower towards the north and south poles.
Coriolis Scale scales the value calculated by the coriolis texture. Its effect is to vary the contrast between the clouds and the underlying surface. Smaller values create less contrast, and larger values display a high contrast between the clouds and surface.
Coriolis Twist is the amount of twist or rotation of the clouds from the poles to the equator.
Coriolis
Offset is added to the value calculated by the coriolis texture.
Larger values create more dense clouds and smaller values result in fewer,
thinner clouds.
 Cyclone
Cyclone is a turbulence texture with a single vortex, used to simulate cyclones and hurricanes.
Cyclone Radius is the maximum radius of the cyclone. Outside of this radius, the clouds will not appear twisted.
Cyclone Twist is the amount of twist or rotation of the clouds within the cyclone radius.
Cyclone Offset is added to the value calculated by the cyclone texture. Larger values create more dense clouds and smaller values result in fewer, thinner clouds.

Dented
Dented is a turbulent noise function that creates crumpled dent patterns. Scale adjusts the magnitude of the texture output.
Power is the fractal dimension of the dent texture. A value of 1.0 looks like crumpled paper. 3.0 makes smaller, isolated dents on the surface.
Frequency is the frequency of the dents, affecting the detail of the pattern.

FBM Noise
FBM Noise is a typical homogeneous fractal noise function since the fractal dimension does not vary.

Hetero Terrain
Hetero Terrain is a multi-fractal texture that is smoother at lower elevations and progressively gets rougher as the altitude increases.

Hybrid Multi-fractal
Hybrid Multi-fractal is another multi-fractal texture that smoothes the valleys of the texture at all altitudes, not just at lower elevations.

Multi-fractal
A multi-fractal is a function whose fractal dimension varies depending on the location of the point being shaded or displaced. This is similar to FBM, except that it uses multiplication in its inner loop computation rather than addition.

Puffy Clouds
Puffy Clouds is a thresholded FBM noise function that creates soft, puffy cloud patterns.

Ridged Multi-fractal
Ridged Multi-fractal is a hybrid multi-fractal texture that uses a threshold value to create ridges in the terrain.

Turbulent Noise
Turbulent Noise (formerly TurbNoise) is a modified FBM texture that uses an absolute value function, adding a turbulent effect to the texture.
